The SharePoint search functionality, and the search in SharePoint Online in particular, is quite powerful and helpful. But it is not magical. As an intranet team member, champion or administrator, you can help the users take full advantage of the search capabilities and help them find what they need.
I have also given a talk about this subject at the Office 365 Saturday Europe on November 15th; these are the slides I used.
What do we want from the search?
Users want the search to allow them to:
- Find the right information so that they don’t miss anything relevant
- Manipulate the result (filter, sort), so that they end up with the right info only, no clutter
- See at the result at a glance, so that they can judge it and then use it
SharePoint’s search can help us do that. I always have to search hard (duh…) for resources specific for SharePoint Online, because the search in SharePoint 2013 is similar, but there are differences. This is the official SharePoint Online service description.
To help find the right information
Tip 1: Explain how it works
Searching does not have to be complicated: You can just enter a search term and hit enter. Or you can do a more advanced search, using operators like term1 AND “an exact search phrase between quotes”.
You filter the result by selecting a search vertical: instead of searching Everything, search People, Conversations of Videos, which are available by default. And you can filter the result by using the refinement panel on the left. Put your cursor on a result, and you will get more details and a preview, to allow you to decide if the item is what you are looking for.

Search for one or more terms. In the result, you have options to select another search vertical (e.g. Videos), and filter with the refinement panel on the left. And hover over a result to preview it.
A tip to give to the innocent users who contribute content, is to enter proper metadata, especially the title. The search mechanism uses these metadata to bring up relevant results.
By default, the most relevant item is displayed at the top of the result list. What is most relevant, is determined by a complex mechanism that takes into account the types of content that are found (Powerpoint is considered more relevant to innocent users than Excel files), how often the search term appears in the item and where (if it is in the title, it is considered more relevant than if the term only appears deep down in the text). But it also takes into account dynamic factors like how often the result is clicked by users. So the analytics component of SharePoint Online keeps improving the relevance of the search results: don’t be surprised if you don’t always get the same result.
See for details the Overview of analytics processing in SharePoint Server 2013 that was also linked from the official SharePoint Online service description, so apparently it is also valid for SharePoint Online…
Tip 2: Explain what is not found
Some results are deliberately not brought up by the search mechanism. This can be confusing to the innocent users, so we should explain it. See for more details the previous blog post Why is that document not found? 6 tips to troubleshoot the SharePoint Online search.
- Duplicates: only one is shown, not the other copies of the same item. Even if they are not exactly the same.
- Items for which you don’t have permission. Which makes sense, because you don’t want to show a result, only to block the user when she tried to access it.
- Unpublished drafts that are only visible to editors. You can only see unpublished drafts that are configured to be visible to all user. Apparently the search crawl account only has read permission.
- Site or list excluded from search. Again, that makes sense. But users can get confused if they remember that the item exists somewhere and don’t understand why they cannot find it.
- Synonyms. In SharePoint Online you can provide synonyms for your terms in the term store. But at present, the search in SharePoint Online cannot not do anything with these synonyms.
- Too recent: the items have not been crawled yet…
Note: there are also some search limits for SharePoint Online. For example, very large documents are not crawled in their entirety. So far I have not had issues caused by these limitations in my projects, while I have had questions that were answered by the bullets above. But that may well change of course.
Tip 3: Boost authoritative items
As we stated in Tip 1, the items that are deemed to be most relevant are displayed on top. The relevance ranking takes many factors into account. But as an administrator or site (collection) owner you can also influence them.
As a site (collection) owner, you can set Query Rules for your site (collection). As an administrator you can do so for the entire environment. Using a query rule, you can specify what should happen in certain conditions. For example, if the user enters a specific search term, then a particular item is promoted at the top of the search results.
How? Click Site settings > Site collection administration or Search: Query rules. To set or view a query rule, you first need to specify the result source, like the local SharePoint results. Then you can specify in a new rule under what condition something should happen and what action then should be taken if these conditions are met. See Manage query rules for details.

Set query rules for the selected result source, e.g. to promote a specific result for a keyword.
As an administrator, you can also set Authoritative pages in the SharePoint admin section. See also the SharePoint Online search administration overview and the subsequent Manage authoritative pages. The closer (less clicks) the item is to an Authoritative Page, the higher its relevance. So if you have a site that contains content that is particularly relevant, set it as an Authoritative page. On the other hand, if you have a set that is particularly irrelevant, you can demote it.
How? Click Admin > SharePoint > Search > Manage Authoritative pages:

Set authoritative pages that are very relevant.
Tip 4: Monitor the search
In the previous tips we discussed how you can influence the relevance of items in the search result. But to take advantage of that, you should monitor the search. Not just when you launch it, but continuously. Pay attention to the feedback the users give you and keep an eye on the search reports.
When you see what were the top queries, what searches led to no result and which queries were abandoned, you can act on that knowledge: change the authoritative pages and query rules, add or change the metadata. Or even ask for content that turns out to be missing altogether.
As a site collection owner you can check the search reports for your site collection. And as an administrator you can get reports for ShaePoint Online as a whole.
How? Click Site collection administration > Popularity and Search reports, or Admin > SharePoint > Search > View Usage reports (see also View usage and search reports):

Search reports for the site collection.
Filter and sort the result to get rid of the clutter
Tip 5: Search Center for portal
Users on the homepage of the SharePoint Online intranet, or more generally in the portal, usually want to search everything: they are at the front door and want to find something in the environement as a whole. And because they are searching everything, it is very important that they can filter the potentially huge result to narrow it down to what they are looking for.
The Search Center that SharePoint contains by default allows you to configure the results pages, to show the information and the refiners that are most suitable to the users in your organization. The site collection ‘search’ is available by default.
You can start making use of it, by entering its url in the search settings of the portal site collection, and selecting that you want to send queries to the results page of that Search Center. Then you can edit that results page to meet your needs. See also Manage the Search Center in SharePoint Online.
How? Click Site settings > Site collection administration > Search settings:

Search settings to use the search center.
Tip 6: Search this site in teamsites
Contrary to users in the portal, who want to search everything, users in a team site usually want to find something in that team site first. After all, they have navigated here purposefully. So make sure in the search settings of your team sites, that the users search this site by default. But allow them to search everything or one of the other search verticals instead, if they prefer. See also Specify search settings for a site collection or a site.
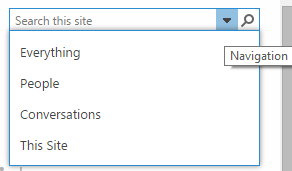
Search from a team site: by default within this site, or elsewhere.
How? Click Site settings > Search settings > Turn on the dropdown menu:

Team site search settings: search in this site, but allow the user to search everything via the dropdown.
Tip 7: Add relevant refiners
In the Search Center we discussed in Tip 5, you can edit the results pages and add refinement options that are relevant to your organization. For example, you can allow the users to filter by content type, theme, business division or whatever metadata are relevant for you.
Select the refiners carefully, because you should not add too many of them. SharePoint may get slow if there are more than 10 refiners. And users will need to scroll down too far in order to even see the last refiners. Note that only the refiners that actually have results are displayed. The advantage is that users will not be led to click a refiner that yields zero results. The disadvantage is that not everybody understands, so explain it.
How to add these refiners? On the search center results page click Edit > edit refinement web part > add or remove refiners and move them up or down:

Edit the refinement panel in the search center.
You can simply select standard SharePoint metadata as refiners. If you want to use your own custom metadata as refiners, you need to make them available first, by adding them to the search schema, as refinable managed properties.
Note: in SharePoint Online, you cannot add new managed properties. What you need to do is use one of the existing “empty” refinable properties, like RefinableString01, and map the crawled property to it corresponding to your custom metadata; pick the one labeled ows_[MyProperty]. For more details, see Ben Prins’ blog post SharePoint Online: Search refiners and searchable columns and How to add refiners to your search results page in SharePoint 2013 (most of it is applicable to SharePoint Online too; not the reindexing though).
You can do this as a site (collection) owner for your site (collection) in the search center, or as an administrator for the entire SharePoint Online environment.
How? Click Site settings > Site collection administration or Search: Schema, or
Admin > SharePoint > Search > Manage Search Schema.

Search schema: connect your custom crawled properties to RefinableString managed properties.
Tip 8: Use meaningful labels
Of course you should always use meaningful labels, for everything. But in the context of the search, this is even more important, because some labels are rather unclear to completely meaningless if you are not careful. In particular, this applies to the labels of the new refiners that you add, and to the sort order options.
The custom refiners that we discussed in Tip 7 by default are called RefinableString01 etc. You need to change the display name.
How? Edit the results page > Edit refinement web part > select the refiner > fill in the display name:

Change the display name of a search refiner.
By default, the search result is sorted by relevance. In the settings of the webpart on the results page, you can allow the users to select a different sort order. The labels of some of these sort orders are not very clear though. In the translation to Dutch (I have only checked that translation), the label is even more incomprehensible. However, you can change the label:
- Lifetime Views = Most viewed
- Recent Views = Most viewed in the last 2 weeks
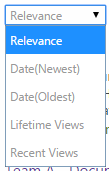
The user can change the sort order of the search result.
How? Edit the results page > Edit the Search Results web part > Settings > Available sort order: change the name of the label you want to change, e.g. “name”:”Lifetime Views” becomes “name”:”Most viewed”:

Change the sort order settings.
See, judge and use the result at a glance
Tip 9: Predefined search overviews
In addition to allowing the user to search her own results, you can also offer dynamic overviews that are based on predefined search queries. Then the user does not even have to perform a search to see what’s new and relevant in that part of the intranet. For example, you can display a ‘Who is Who’ page that displays people results at a glance.

Who is who page, with a predefined people search result.
How? Create a who is who page in your search center > Edit the search result web part > Change the query > Query text: {searchboxquery} contentclass:spspeople -{spoapp} -{spocrawler} -{Foreign}

Who is who page query.
Or you can display the most popular items, or the latest pictures.

Standard SharePoint search based content and content roll-up webparts, with standard configuration options.
How? There are standard webparts for this, in the sections Search-driven web parts and Content Roll-up.

Search-driven Contentweb parts and Content Roll-up web parts
Put one of these webparts on your page > Edit the web part > Select a display template for the control and for the item to determine what the result looks like (e.g. a list with two lines, or a slideshow with big images.
You can also change the query, if the default query does not suit you. Note: in the query wizard, you need to switch to advanced mode in order to change the sorting, for example to LastModifiedTime to see the pictures that were last modified. See Configure a Content Search Web Part in SharePoint.
Tip 10: Display relevant properties
To help the users see and judge at a glance what they have found in the search result, you can change the the overview and hover panel, to display the properties that are important for your organization. For example, the theme of the content or the contact details of a person.

Special display templates for the Who is Who page, displaying additional properties.
You can do that as the owner of a publishing site (collection) or the administrator, by creating new Display Templates. These templates are HTML and some scripting, so you don’t have to be a developer to do create them. I am not an HTML or scripting guru, but I can still create display templates, by copying existing SharePoint and making some changes to the copies.
How? The most basic way is this: Starting with a publishing site (you don’t have this option in a team site) click site settings > Masterpages and page lay-outs > Display templates > Search >Download an original HTML file of a similar template as a starting point > edit the HTML file> upload the new file; the .js is created automatically so you don’t have to do anything with that file. Then select your new display template in the search results webpart where you want to use it. See for more details Change how search results look by using result types and display templates and the series How to change the way search results are displayed in SharePoint Server 2013.
So you see, you can enhance the search functionality offered by SharePoint Online to help the users find what they need, and you can do it without developing custom software. You just need owner or administrator permissions, for some things. And most of all, understanding of the possibilities.