Now that we cannot conduct a classroom training in an actual classroom, due to the threat of COVID-19, we do our training in a virtual classroom in Microsoft Teams. Actually, this is also a valid alternative after the pandemic, because it can save a lot of travel time. But how can we ensure that the training participants learn something for real in this virtual classroom? Here are 15 tips for things you should to do before, during and after the virtual training session.
Of course there are other ways of learning in the virtual world instead of classroom training sessions, like instruction videos and self-paced e-learning modules. But in this article we focus on virtual classroom training, where a group of participants can learn together, interactively. We use classroom training particularly in scenarios where a shared experience is important. For example, in a department that starts working in a new way with Microsoft 365, where the employees not only want to learn how they should use the tools to get their jobs done but also want to discuss how to apply the tools in their team and how it will change their way of working.
A virtual classroom training session is a special case of a virtual presentation. So these 20 Tips for presenting online also apply.
Before: Set up the training and invite the participants
1.Plan the training in the right set-up
How you should set it up, depends on the type of training your envision. For example, if you aim for a large-scale presentation, you can set up a Teams Live Event, where the presenters tell their story and show their demos, while the attendees can only ask questions via the Q&A panel.
However, if you want to conduct an interactive training, set it up as a Teams Meeting with few restrictions as to who can present and use their microphones. And most of all: keep the group small. Technically speaking, you can squeeze 250 people into your virtual classroom. But if you want to allow for real interaction, keep the group to 10 – 20 participants at most.
We used to organise training sessions that would take an entire day or an entire morning. In the virtual world, we split them into sessions of at most 2 hours, because video conferencing it is more tiring. Don’t forget to plan for a short break after an hour, if not more often.
2.Set up a training environment
For your training, you need more than just a meeting room. Even when I conducted real-life classroom training, I set up a training environment in Microsoft Teams: a Training Team where we could share information before, during and after the actual training session. Not only from the trainers to the participants, but also the other way around and amongst the participants themselves.
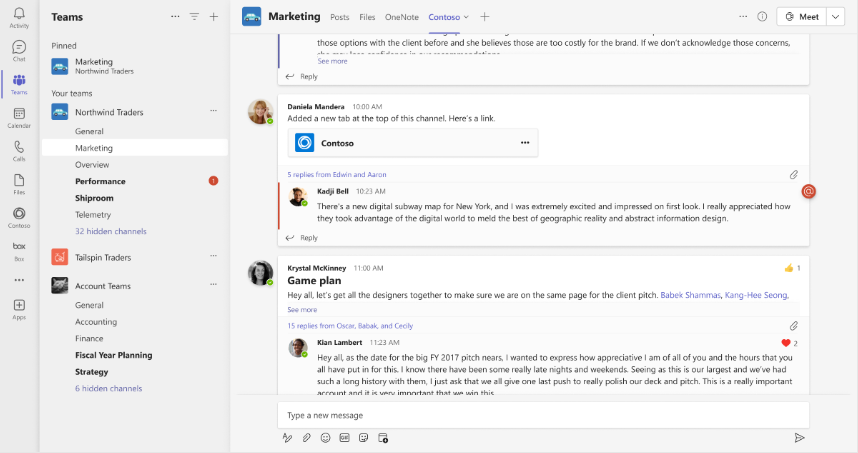
We did a training programme for different departments, with sessions on different themes. To facilitate this, we created a Training Team for each department and in that Team set up a channel for each training on a different theme. In each channel, we had information about that training, conversations, shared files and notes.
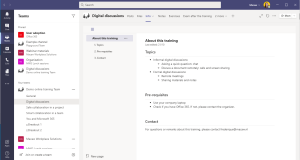
A Training Team for a training programme on Office 365, with a channel for each training theme.
3.Set up your physical and hardware environment carefully
In the real world classroom training, we had to make sure that there were enough chairs in the room and that the screen/beamer was working. In the virtual world, the set-up is like the one we need for virtual meetings. Only for a serious training, you may need to pay even more attention to your set-up than for an information get together with your colleagues. See for more details: 20 Tips for presenting online.
Use a good microphone, like a decent headset, and put your webcam at the right height and angle.
4.When you invite the participants, explain how it works
For any training, you’ll want to make sure you invite the participants plenty of time in advance and state what they will learn in that training. What is different in the virtual world, is that you may need to explain how the participants can actually enter the virtual classroom. Not everyone is sufficiently familiar with Microsoft Teams Meetings…
Include brief instructions in the invitation (“Click on the Join Teams Meeting”) and provide a link to a more detailed help page / user manual with full instructions including screenshots. And I offer to help anyone who cannot figure out how it works following these instructions, to schedule a practice run with them so that they can try it out before the important training session begins.
We also invite them to the Training Team, and explain that they can find all the relevant information in there. We schedule the meeting as a Teams Meeting in the appropriate channel, so that the chat of the meeting and its recording automatically become available in the Training Team afterwards.
5.Ask input beforehand
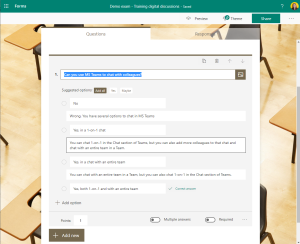
In order to finetune your training, ask your participants for input. For example, do they have experience with MS Teams Meetings? Or: which version of Windows do you have, so that you can pick the right demo laptop? For this purpose, you can use a poll in the Training Team. You easily create a poll in the Team conversation: in a new conversation, click the … ellipsis, select Forms and enter your questions and answer options.
Note: if you select the checkbox that the poll should be anonymous, it really is anonymous. In the past, the author of the poll could see the names of the voters, but that has been fixed now.
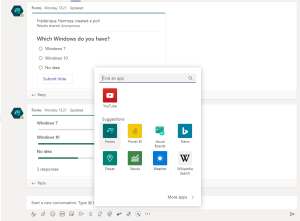
Create a poll in the conversation of the Training Team.
During: Deliver the training
You conduct the training inside a Microsoft Teams Meeting, instead of real world classroom.
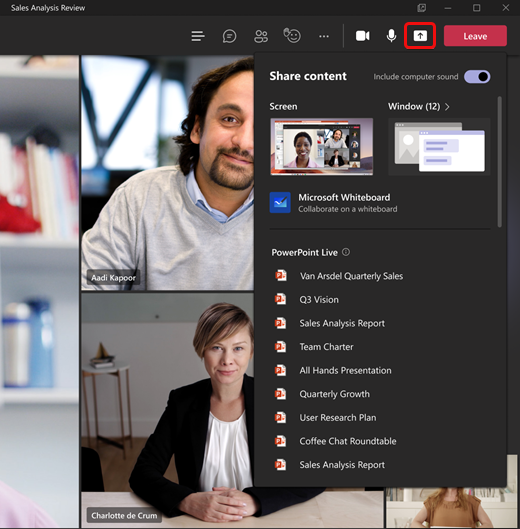
6. Share the right content
As the trainer, you tell your story, presenting for example a PowerPoint slide deck and a demo. In the real world classroom, you had the presentation and demo on the big screen and you were standing next to it. In the virtual world, you need to determine how you want to share your content in your Teams Meeting.
You can share a specific PowerPoint presentation. The advantage for you, as the presenter, is that you see the video thumbnails of the participants when you share your presentation in this way.
Please note: by default, the participants can browse through your PowerPoint by themselves. If you want them to stay with you, click the eye icon to block them from clicking through the slides.

Sharing a specific PowerPoint presentation. Click the eye icon to stop the participants from browsing through your slides on their own.
Sharing a specific PowerPoint presentation is less practical when you want to switch between the PowerPoint presentation and one or more demos. For that scenario, sharing an entire screen, and everything on it, works better. I tend to show a lot of demos in my training sessions, usually in different apps, so I share my screen: screen 2, and I keep screen 1 for my own notes and application I don’t want to show at that time. However, when I do a bit of PowerPoint and switch PowerPoint to its presentation mode on the shared screen, I no longer see the video thumbnails or the chat or anything like that. So I depend on my moderator to keep an eye on the participants.
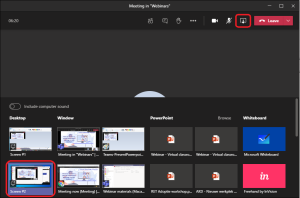
Share an entire screen, I have two screens, and I share the second screen.
7. Avoid a monologue and use your video to make your presentation more lively
In a virtual classroom, it is more difficult to keep the participants’ attention. So make sure the participants don’t fall asleep listening to you drone on. It helps if the moderator breaks up the monologue: relay questions that were asked in the chat, add remarks with an example from their experience etc.
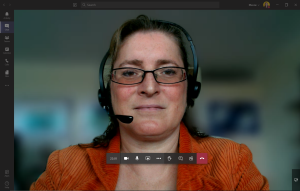
It also helps if you leave your video feed on and the participants can see you talk. You are not a robot after all.
Please note: be careful with the spotlight functionality. If you really want to look the participants in they eye and talk to them, you can put a spotlight on yourself. But that means that your ‘talking head’ replaces the screen you are sharing in the spotlight. The participants can find the shared screen in the row of thumbnails at the bottom of the screen and click on it to get it back. But I have often heard participants get confused by this. So be careful.
Later this year Microsoft will gives us an option to transpose your video feed onto our presentation. That will make your story look more personal.
![Display your video feed on top of your presentation in a Team Meeting [Microsoft screenshot]](http://blog.frederique.harmsze.nl/wp-content/uploads/2020/09/Teams-CustomLayout-VideoPresentation-300x167.png)
We will be able to transpose our video feed on top of our presentation (by the end of 2020; Microsoft screenshot)
8.Facilitate the conversation
In an interactive training session, conversation is key. So if you can trust your participants to behave, do not restrict their access to their microphones. In my training sessions I could fortunately trust my participants to mute their microphone when they were not talking and to refrain from talking over each other.
Ask the participants to raise their hand when they want to talk; the moderator can give them the floor by just telling them to go ahead and unmute. Please note that either the participant or the moderator should lower the hand after the participant has started talking – I often see ‘old hands’, which are still raised to flag an earlier question.
The participants can also ask questions or make remarks in the chat. If it is a simple question, the moderator can answer in the chat. This is the best way to ask and answer practical questions that don’t concern all of the participants and would interrupt the flow of the presentation (“where can I find the slides”, “I have to leave early”, “How can I access the demo environment”). More interesting, complex questions should be asked in the main presentation via the microphone. The moderator can do that, if the participant cannot unmute for some reason.
9.Use polls and quizzes to interact with the participants
From time to time, shake things up and do something different. For example, ask the participants to vote on a poll or do a quiz. At this time, you can for example create a poll in Microsoft Forms, allow the participants to scan a QR-code or click a link to open it, and share the Forms page with the result in the session.
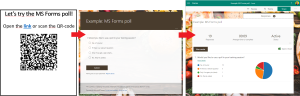
Allow the participants to open the poll via a link or QR-code and then vote on the poll. Show the results via your shared screen.
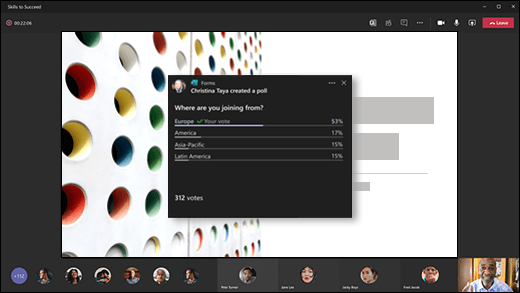
Later this year, we will also get poll functionality inside Teams Meetings; these seem to be the same polls we can already create in a Teams conversation. The new poll functionality will allow us to set up polls before the meeting and then launch them at the right moment inside the Teams Meeting. For such polls, the participants to not have to scan any QR-code or navigation to some other location in any way.

Set up polls inside the Teams Meeting and launch them at the right time inside the meeting (by the end of 2020; Microsoft screenshot)
You can also make a more fancy poll or quiz, that give the audience more of a ‘wow’ factor. A Kahoot quiz for example is quite playful, with music, colours and pictures. Please note: Kahoot quizzes and third party poll apps do not live inside your tenant. So if security is strict in your organisation, you are not allowed to use these third party apps.

Create a Kahoot challenge, with questions and multiple choice answers. The participants who has the best answers and the quickest response wins.
10. Let the participants do exercises in breakout rooms
For me, what distinguishes a training session from a presentation, is that the participants are able to try it for themselves: do exercises in a safe playground environment. I like to let my participants do these exercises in couples, two by two, so that they can explore together and learn from each other.
In the real world classroom, they would sit together at a table. In the digital world, I give them a digital room where they are in charge: they can talk, share a screen with each other, take a minute to grab a coffee. And they can ask me to join them in their digital room if they have a question, by @-mentioning me in the chat of the main meeting or in their own meeting; the @-mention is key! We did this as ‘Meet now’ meetings in the channel or in separate exercise team channel meetings in the Training Team. But soon we will get official breakout rooms functionality in Teams Meetings! It is expected by the end of 2020.
With these breakout rooms, you can assign the participants to a breakout room beforehand. When the exercise time starts, you can open the breakout rooms and move everyone into their assigned breakout room automatically. As the trainer, you can hop between these rooms and post announcements to all rooms (“We have 5 minutes left”). When the exercise time finishes, you close the breakout rooms and everybody gets moved back into the main meeting automatically.
![Breakout rooms in a Teams meeting, for brainstorming in sub-groups for instance [Microsoft screenshot]](http://blog.frederique.harmsze.nl/wp-content/uploads/2020/09/Microsoft-Teams-Breakout-Rooms-Manage-300x168.jpg)
Breakout rooms in a Teams meeting, to do exercises in small groups (by the end of 2020; Microsoft screenshot)
After: Collect feedback and keep in touch
Learning should not stop after your training session…
11.Get feedback
After the training, you want to collect feedback on what went well and what needs to be improved. You can ask for quick feedback in a poll or more elaborate feedback in a survey. Microsoft Forms can facilitate both.
Offer a QR-code and link at the end of the session, so that people can give their feedback right away. But also provide it in the Training Team, for participants who have to run at the end of the session and want to consider their answer more carefully. You can include the survey in a tab in the Training Team.

A Microsoft Forms survey to collect feedback after the training, included in a tab of the Training Team.
12.Launch a quiz
Do you want to check if the participants learned anything in your training? You can create a quiz in Microsoft Forms. If this is an informal quiz, you can just make it available after the training in a tab of the Training Team and ask the participants to take it. For an informal quiz, it does not matter that the participant looks the answer up; what matters is that they go through the material and think about it.
Create a quiz in Microsoft Forms. You can indicate the right answer and explain what is wrong with the other answers.
If you need more of a formal exam, you have to guard against cheating. So you cannot let the participants take the quiz in their own time: they should do it during the Teams Meeting, with their camera and microphone switched on to monitor them. And in Windows 10 there is a ‘Take a test’ app that clears their clipboards and disables the participants’ access to the outside world. In MS Forms, you can sort the questions randomly and shuffle the options in the multiple choice. Fortunately, I never had to organise real exams for my trainings…
13.Share all relevant information with the participants
Make the latest version of your materials available via the Training Team in MS Teams, so that the participants can check back. Did you make a recording? That can be found in the Training Team too. A recording of the central ‘auditorium’ part of your training can be useful; the decentral exercises, not so much.
If you have an information portal with more information about the training topic, promote that everywhere: tell the participants during the training where it is and link to it from the Training Team, in a tab, in an announcement in the Posts, in the information tab…
14.Get back to ‘parked’ questions
Were there any question that you could not answer straight away during the training session? I usually ‘park’ those in the OneNote notebook associated with the Training Team. Do not forget to get back to those questions afterwards! Answer the question in the conversation of the Training Team, @-mentioning the person who asked the question.
15.Invite the participants to the knowledge sharing community
The participants may have new questions when they start working in the new way. They may find interesting new solutions. The toolkit will evolve. So it is very helpful if they keep in touch after the training, in a knowledge sharing community.
We had a community in Yammer. Everyone could join, but we specifically invited the training participants, because they were clearly part of the target audience.
So yes, you can organise and conduct virtual classroom trainings in Microsoft Teams, and you will even get more options by the end of 2020. A virtual training mirrors the real life classroom training, but you do need to prepare it specifically as a virtual training and test everything thoroughly. We don’t have to stop learning and we don’t have to stop training people just because we have to work from home…


![Display your video feed on top of your presentation in a Team Meeting [Microsoft screenshot]](http://blog.frederique.harmsze.nl/wp-content/uploads/2020/09/Teams-CustomLayout-VideoPresentation.png)


![Breakout rooms in a Teams meeting, for brainstorming in sub-groups for instance [Microsoft screenshot]](http://blog.frederique.harmsze.nl/wp-content/uploads/2020/09/Microsoft-Teams-Breakout-Rooms-Manage.jpg)


