Now that many of us work from home, to avoid spreading the coronavirus and catching Covid-19, we are fortunate to have options to conduct out meetings online. We can talk with each other with the audio functionality, see each other with the video functionality and see our work with the screen sharing functionality of Microsoft Teams. Let us take a look at 12 tips based on our recent experiences, with some associated bonus tips. They are geared towards Teams-meetings, but most of them also apply to Skype-meetings or other online meetings.
1.Use Teams-meetings to meet online
In the organization where I work, we have both Skype for Business and Microsoft Teams at our disposal. Skype-meetings are more familiar to many users, but we stimulate the use of Teams-meetings. The main reason right now is that Teams-meetings are more robust and stable, especially in these times of overloaded networks and systems. Microsoft Teams does sometimes “wobble” at bit: video gets stuck, presentations don’t load properly. But Teams still works better than in Skype. Some people are using free internet tools like Zoom, but those are banned within the company, because you pay for these “free” tools with your data…
2.Use a headset or other audio device to talk
To get good audio experience, you should use a headset instead of shouting at the standard microphone incorporated in your computer. You can hear better what the speaker says, but most of all: the other participants can hear you better when you contribute. Without a headset, you also tend to get strange echoes. Many of my colleagues use the ear plugs that came with their mobile phones, so try those if you don’t have an “official” headset.
Back in the day when I could be in a meeting room with some colleagues, I often used a speakerphone to have a conference call with the rest of the team; that device picks up the other speakers as well. Right now, I am working at home by myself, so no other speakers to pick up. Nevertheless, I sometimes switch to this device, when my ears get tired of the headset: it has a smart microphone that focuses on my voice.
2a. Check your device seetings if your audio is troublesome
Did you plug in a headset but it doesn’t give you sound? Check the device settings and switch if necessary.
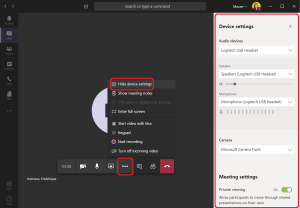
Check your device settings and select the correct audio device and camera.
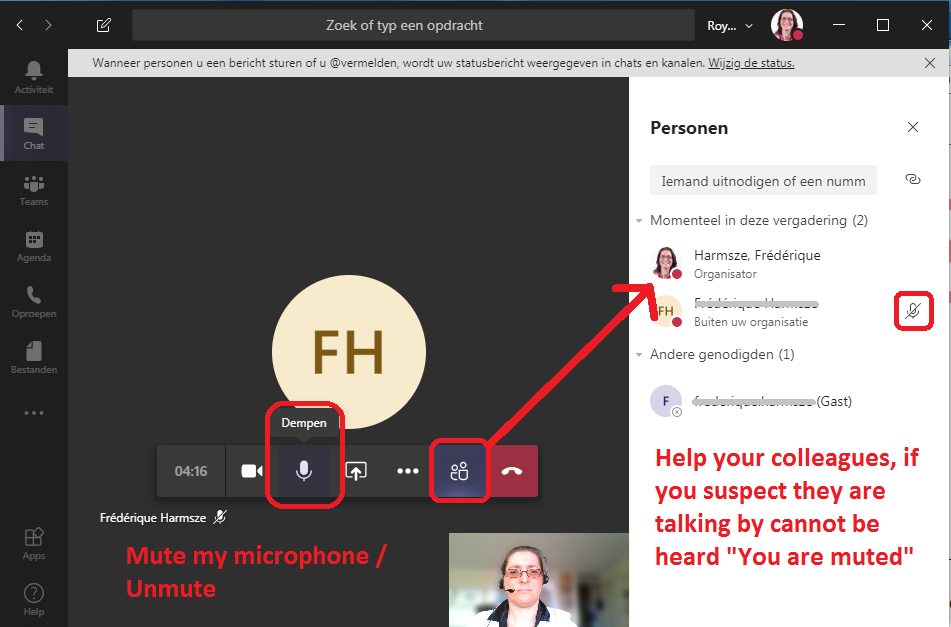
3.Mute your microphone
Make sure to mute your microphone when you are not talking, if you are in a noisy environment or if you don’t use a headset. This is particularly important if you are in a large meeting with many participants. The meeting will get very messy, when you hear the washing machines, children, neighbours with power drills or even just coughing from ten participants…
3a.Don’t forget to unmute when you want to talk!
It is easy to forget that you have muted your microphone or to “mis-click”. I am not the only one who has made some very intelligent remarks (well…) only to myself, because I had not unmuted my microphone properly. So unmute and check that you have unmuted before you tell your story.
4.Help each other
We’re in this together, so let’s help each other. Especially now that many people are forced by the coronavirus to conduct online meetings and use tools that they are unfamiliar with. For example, if you think colleagues may be talking to themselves because their microphone is still on mute, please remind them to unmute.
You can check whose microphone is muted in the Teams-meeting via the Participants button: the mute icon is displayed for participants with muted phone.

Mute and unmute your own microphone. And help your colleagues, if you suspect they are accidentally muted: check their microphone status via the Participants button.
5.Use the chat in the meeting
If you cannot talk, use the chat within the Teams-meeting to ask your questions or place your comments. The chat is the way to go, for example, if your microphone does not work, if the ambient noise is bad or if you are in a large meeting where things would get chaotic if everyone just spoke up via audio.
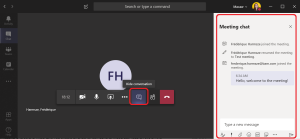
Microsoft Teams meeting chat
6.Don’t talk at the same time
The larger the meeting, the more you have to pay attention to “speaker management”. In a real life meeting, it is impolite and tricky to talk at the same time instead of waiting for the other participant to finish his or her sentence. In an online meeting, it is worse: the meeting becomes incomprehensible.
Use the chat to ask questions and give short comments. If the meeting is large and important, you should arrange for someone to moderate: keep an eye on the chat and pinpoint the items that need to be addressed via the audio, by the presenter or by the participant. The moderator can then give the floor (i.e. permission to unmute the microphone) to the right person.
6a.Mute all
Weird noises in your meeting from unmuted microphones? You can mute them all from the People pane. This option only appears if there are enough microphones open and there is something to be muted. Please note: everybody in the meeting who has the presenter role (the default for colleagues in your organisation) can use this ‘Mute all’ option.

7.Use video to support non-verbal communication
It is helpful if you can see each other, when you are talking. Especially if you are stuck by yourself, quarantined in your home, you don’t see anybody in real life and you are getting lonely. Switch on the video-option in the Teams-meeting and make sure your webcam is uncovered.
Please note: at the moment a Teams-meeting displays at most four video feeds: the person who is talking and the people who talked most recently. Microsoft is working on showing us more participants (see Uservoice). If you don’t want to see the current and recent speakers, you can also pin specific video image to your canvas, as a participant – this selection is only visible for you.
Update May 2020: Now we see up to nine video feeds, instead of four, in the main screen. You will some more as small thumbnails at the bottom of the screen.
7a.Check your video image
You will see your video image at the bottom of the Teams-meeting, on the right. So you can tweak things like the angle of the camera, your hair and the lighting: avoid sitting with your back to the window or other light source, or you will only show up as a silhouette. And of course this video image will make it clear if you have forgotten to slide back the privacy cover your webcam.
7b.Switch off your video for discretion
Turn off the video, before you do something embarrassing (pick your nose extensively, put your underwear on the clothesline or in extreme cases go to the bathroom bringing your laptop with you… no, I refuse to link to the YouTube video of the conference where that happened…). Just click on the video button again and check that your video image is no longer visible at the bottom of the screen.
8.Blur your background – update: or use a background picture
In a Teams-meeting you have the option to blur your video background (this option is not available in Skype-meetings). This minimizes the distraction for the meeting participants, and it hides the mess you in your room or the sensitive pictures on your wall that you don’t want to show your colleagues. You will find this option under the … menu > ‘Blur my background’. If you want to show something, you unblur it again with another click.

Switch your video on and off with the video button. Blur your background for focus; only unblur it if you want to show something.
Update: Since April 14th, Now I also get the option to use a background picture instead of blurring my own home office. Microsoft offers a set of photos and paintings, so I can choose a nice and tidy office or a beach or the galaxy for example. At the moment, there is no button to upload my own images. But you can do that if you navigate to this folder on your computer: C:\Users\[you]\AppData\Roaming\Microsoft\Teams\Backgrounds\Uploads (please note, most people don’t see the Appdata folder, so go there by entering %AppData% in the address bar). And I have cropped and resized my photos to fit the 1920 x 1080 px that the standard images had, because on my first test the horizon ended up in a strange place.
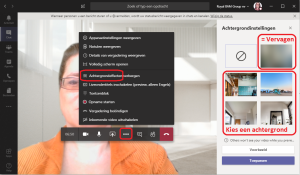
Blur the background of my home office or choose a picture as my background
Update June: And now we also have a button to add new images to our backgrounds.
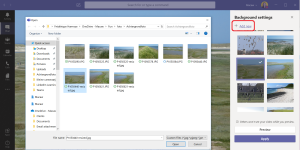
Upload your own image to your backgrounds gallery
9. Share your screen
If you want to talk people through a presentation, report or demo: share your screen so everyone in the meeting can see what you are talking about. In a standard Teams-meeting or Skype, all colleagues from your organisation have the role of ‘presenter’ and the option to share their screens, but external participants can’t. Just click on the screen icon in the meeting toolbar and select the screen you want to share.
In informal meetings, I prefer to share my desktop as a whole, because then I can switch between applications and the participants can see everything I show.
9a.Share only a specific screen if you work with sensitive information
If you work with sensitive information, be careful of the screen you share. Especially if you share with a large group and/or external participants. In this case, it is not safe to share your entire desktop, because you may inadvertently show a confidential document or a sensitive email message may land in your mailbox in full view. So share a selected screen, like your PowerPoint presentation or your report.

Share your entire desktop or a specific window or presentation
10.For larger meetings, separate presenters from attendees
In a regular meeting, everyone can take over screen sharing and everyone can mute all. If your organise a meeting with many and/or unruly colleagues, invite them as attendees with only selected presenters. See the overview of the roles in a Teams meeting. You will find the options for these settings via the link ‘Meeting options’ in the body. Then you can determine who can present: everyone, only you or specific people. You can only select colleagues from your organisation, you have already added to the invitation.
Please note: at the moment, these options are different from the Skype-meeting options that you will find in the ribbon of a Skype- invitation. In Teams you cannot switch off the microphones and video cameras of all attendees beforehand. I you need to keep your attendees more in check, you should set up a Live Event.
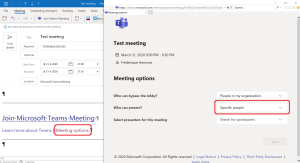
Select the presenters via the link ‘Meeting options’ in the invitation
11.Lighten the load for your computer and network
Especially video in online meetings does ask a lot from your system. Even more so in Skype than in Teams. So connect carefully, especially when you have to present something in an important meeting: restart your computer if you haven’t done that in a while, connect the network cable (instead of wifi – and negotiate with your house mates that they don’t overload the network just now) and close all windows and activities that you don’t need in your meeting. If the meeting still falters, switch off the video, especially if you are sharing your screen and your face is therefore less important at that time.
12.Look business-like in video conferences
Some of us don’t make as much of an effort to look nice when we work from home. However, if you use the video, you should try to look presentable. Comb your hair, put on a somewhat business-like top (nobody will see your pyjama bottoms…). And be understanding if things turn out a bit less business-like for a colleague, like in this BBC News interview.
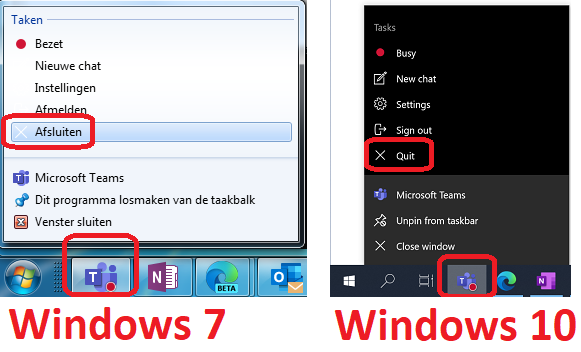
Update: Troubleshooting tip to unfreeze Teams
Update April 28th: Teams froze on me a few times recently. But full disclosure: I was using my webcam with a background … on a Windows 7 laptop. Is Teams frozen solid in your meeting and you can’t get any response? Then quit the application from your taskbar: right-click the icon and then select ‘Quit’. Don’t just close the window, because then Teams will still be frozen when you restart it.

Quit Teams from the taskbar in Windows 7 (Dutch version) and Windows 10, to unfreeze the application
If you follow these guidelines, Microsoft Teams is a great tool for online meetings. If you want to just have a chat, instead of a real meeting, please check out the 10 Practical tips for conversations in Microsoft Teams.


![Teams-Post-DocumentLinl]k-ann](http://blog.frederique.harmsze.nl/wp-content/uploads/2020/04/Teams-Post-DocumentLinlk-ann.png)