Sometimes, standard SharePoint functionality can hit the nail on the head and offer a solution to a problem a client has been struggling with. In this case, it was managed metadata navigation on an image library, combined with an approval workflow. Hey presto, they have an image bank that meets their needs.
This client has a lot of nice pictures. However, they could never find the right pictures when they wanted to use them. Too many low quality pictures crowding out the high quality ones. And too many messy folders in the fileshare where the pictures were stored: they kept keep drilling down into folders that turned out to contain nothing of interest. So when they moved into Office 365 and Sharepoint Online, we set up a solution to help them find what they need and showcase the great stuff that they have.
Let’s look into the solution ingredients in more detail. By the way, the screenshots in this post are not from the client’s site but from tests in my Office 365 demo environment.
Picture library in a team site
We created a normal team site, dedicated to the image bank and all information pertaining to it. We selected the team site template, because the owners didn’t want “official” governance on the pages of the site – no need to work on page drafts and publish them afterwards.
Within the team site, we created a Picture Library. The nice thing about Picture Libraries is that they display image files as thumbnail images. We take advantage of that option to showcase the latest images on the startpage of the image bank site. This is just the regular library app part, sorted by the Created date (descending). If we encourage the contributors to enter the Title when they add an image, all users can see what the image looks like and what it represents.

The picture library, in a view sorted by the Created date
Metadata
Metadata enrich the content by describing it and allow users to find content by searching or browsing by those metadata. In my client’s digital workplace, they already had put subjects in their taxonomy, which they use to tag news, as well as a pick list of their locations. Very useful to tag their images as well.
The subject and the location are handled as managed metadata, in the term store. The advantage of managed metadata is that you can use the same pick lists everywhere in your environment, in all site collections, and that you can manage them as a hierarchy. For example, we have a term called Animals in the Subjects term set, which in its turn contains the terms Birds, Mammals etc.
You can manage these terms via Site settings > Term store management. There you can add new term sets and new terms if you have the right permissions. Please note: even if you are a site owner or site collection owner, you do not automatically have permission to contribute to the Term Store. You need to be added explicitly to the administrators, group managers or contributors within the Term Store itself.

A hierarchy of managed metadata in the term store.
We added managed metadata fields to the picture library and connected them to the Subjects and Locations in the Term Store: select the field type Managed Metadata and then select the term set with the terms you want to offer as choices in your library.

Term set settings of the managed metadata field Subject.
Metadata navigation and filtering
Now that we have tagged the images with the managed metadata Subject and Image Location, we can allow the user to browse the image bank by subject and filter by location and date. For that purpose, we offer metadata navigation and filtering.
To configure this option, we first need to activate the feature, which by default is inactive in team sites: Site settings > Site actions: Manage site features > Metadata Navigation and Filtering: Activate.
Activate the managed metadata navigation and filtering feature
Then we can configure it in the Picture Library: in the ribbon, go to Library> Library settings > General settings: Metadata navigation settings. Note: you don’t see this option? Check if the feature really is active.

Metadata navigation settings in the picture library.
I have configured Subject as the hierarchy field, because it really has a hierarchy. For example, users can select Animals to get all images tagged with the general subject Animals or tagged with any specific animal subject. Or the user can drill down and select only a specific kind of bird.
I have configured ImageLocation and Date Picture Taken as key filters, in order to allow the user to get, for example, all images of birds at the location Westray, taken on or before September 1st.
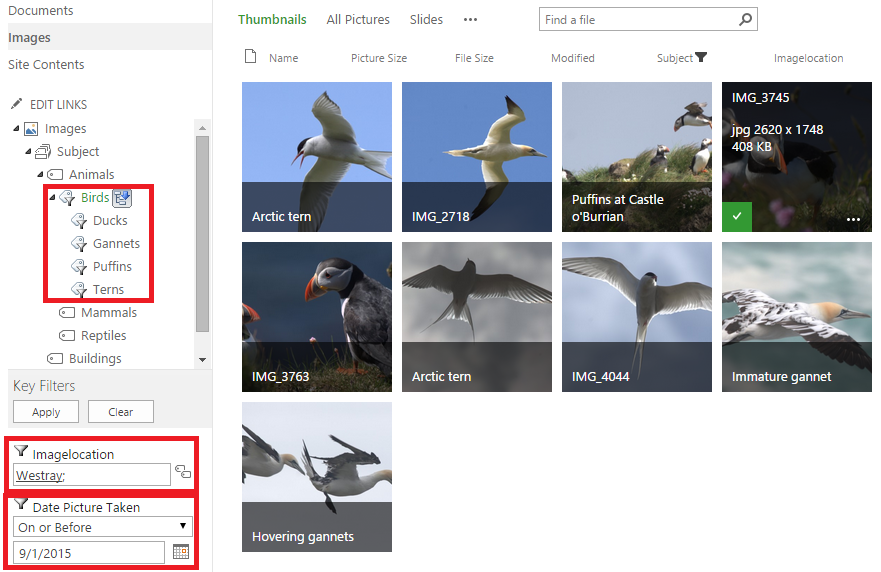
Browse the subjects and filter by location and date using the metadata navigation options.
For more information, see Set up metadata navigation for a list or library at Microsoft.
Approval workflow
To solve the problem of high quality images being swamped by low quality images, we decided to allow only great images in the image bank site. Less brilliant images are welcome elsewhere in the environment, but not in this site. So while we allow all users to upload their great images into the image bank site, we then only display the ones that are judged to be truly great by the Communications team.
For that purpose, we have set up a standard SharePoint approval workflow. Everything as basic and low-tech as possible… We set up an approval workflow, instead of content approval directly in the library settings, in order to have a bit more options: the approval request e-mail is sent to the Communication Team mailbox.
Before we could configure a standard approval workflow, we had to activate the a feature at the level of the site collection: Site settings > Site collection administration: Go to top level site settings > Site collection administration: Site collection features > Workflow: Activate.
Activate the Workflows feature at the site collection level
Then you can add the standard SharePoint 2010 approval workflow in your SharePoint Online site.
In the ribbon of the Picture library, go to Library > Workflow settings > Add a workflow.
Add a workflow
Select the workflow template *Approval – SharePoint 2010, give it a name and select Creating a new item will start this workflow = Yes.

Approval workflow from SharePoint 2010
Onn the next page, you can specify who should approve the pictures and what text they should see in the notification e-mail.
And there we are: the client has an image back that will contain only approved images, where users can browse for images about the subject they are interested in, filtered by location and date. And that is just what they need.