blog.frederique.harmsze.nl my world of work and user experiences

November 30, 2014

Help the users find what they need using the Search – 10 Tips

Filed under: SharePoint — Tags: — frederique @ 23:51

The SharePoint search functionality, and the search in SharePoint Online in particular, is quite powerful and helpful. But it is not magical. As an intranet team member, champion or administrator, you can help the users take full advantage of the search capabilities and help them find what they need.

I have also given a talk about this subject at the Office 365 Saturday Europe on November 15th; these are the slides I used.

What do we want from the search?

Users want the search to allow them to:

  • Find the right information so that they don’t miss anything relevant
  • Manipulate the result (filter, sort), so that they end up with the right info only, no clutter
  • See at the result at a glance, so that they can judge it and then use it

SharePoint’s search can help us do that. I always have to search hard (duh…) for resources specific for SharePoint Online, because the search in SharePoint 2013 is similar, but there are differences. This is the official SharePoint Online service description.

To help find the right information

Tip 1: Explain how it works

Searching does not have to be complicated: You can just enter a search term and hit enter. Or you can do a more advanced search, using operators like term1 AND “an exact search phrase between quotes”.

You filter the result by selecting a search vertical: instead of searching Everything, search People, Conversations of Videos, which are available by default. And you can filter the result by using the refinement panel on the left. Put your cursor on a result, and you will get more details and a preview, to allow you to decide if the item is what you are looking for.

Search result, with options to select another search vertical (e.g. Videos), filter with the refinement panel on the left. And hover over a result to preview it.

Search for one or more terms. In the result, you have options to select another search vertical (e.g. Videos), and filter with the refinement panel on the left. And hover over a result to preview it.

A tip to give to the innocent users who contribute content, is to enter proper metadata, especially the title. The search mechanism uses these metadata to bring up relevant results.

By default, the most relevant item is displayed at the top of the result list. What is most relevant, is determined by a complex mechanism that takes into account the types of content that are found (Powerpoint is considered more relevant to innocent users than Excel files), how often the search term appears in the item and where (if it is in the title, it is considered more relevant than if the term only appears deep down in the text). But it also takes into account dynamic factors like how often the result is clicked by users. So the analytics component of SharePoint Online keeps improving the relevance of the search results: don’t be surprised if you don’t always get the same result.
See for details the Overview of analytics processing in SharePoint Server 2013 that was also linked from the official SharePoint Online service description, so apparently it is also valid for SharePoint Online…

Tip 2: Explain what is not found

Some results are deliberately not brought up by the search mechanism. This can be confusing to the innocent users, so we should explain it. See for more details the previous blog post Why is that document not found? 6 tips to troubleshoot the SharePoint Online search.

  • Duplicates: only one is shown, not the other copies of the same item. Even if they are not exactly the same.
  • Items for which you don’t have permission. Which makes sense, because you don’t want to show a result, only to block the user when she tried to access it.
  • Unpublished drafts that are only visible to editors. You can only see unpublished drafts that are configured to be visible to all user. Apparently the search crawl account only has read permission.
  • Site or list excluded from search. Again, that makes sense. But users can get confused if they remember that the item exists somewhere and don’t understand why they cannot find it.
  • Synonyms. In SharePoint Online you can provide synonyms for your terms in the term store. But at present, the search in SharePoint Online cannot not do anything with these synonyms.
  • Too recent: the items have not been crawled yet…

Note: there are also some search limits for SharePoint Online. For example, very large documents are not crawled in their entirety. So far I have not had issues caused by these limitations in my projects, while I have had questions that were answered by the bullets above. But that may well change of course.

Tip 3: Boost authoritative items

As we stated in Tip 1, the items that are deemed to be most relevant are displayed on top. The relevance ranking takes many factors into account. But as an administrator or site (collection) owner you can also influence them.

As a site (collection) owner, you can set Query Rules for your site (collection). As an administrator you can do so for the entire environment. Using a query rule, you can specify what should happen in certain conditions. For example, if the user enters a specific search term, then a particular item is promoted at the top of the search results.

How? Click Site settings > Site collection administration or Search: Query rules. To set or view a query rule, you first need to specify the result source, like the local SharePoint results. Then you can specify in a new rule under what condition something should happen and what action then should be taken if these conditions are met. See Manage query rules for details.

Set query rules for the selected result source, e.g. to promote a specific result for a keyword.

Set query rules for the selected result source, e.g. to promote a specific result for a keyword.

As an administrator, you can also  set Authoritative pages in the SharePoint admin section. See also the SharePoint Online search administration overview and the subsequent Manage authoritative pages. The closer (less clicks) the item is to an Authoritative Page, the higher its relevance. So if you have a site that contains content that is particularly relevant, set it as an Authoritative page. On the other hand, if you have a set that is particularly irrelevant, you can demote it.

How? Click Admin > SharePoint > Search > Manage Authoritative pages:

Set authoritative pages that are very relevant.

Set authoritative pages that are very relevant.

Tip 4: Monitor the search

In the previous tips we discussed how you can influence the relevance of items in the search result. But to take advantage of that, you should monitor the search. Not just when you launch it, but continuously. Pay attention to the feedback the users give you and keep an eye on the search reports.

When you see what were the top queries, what searches led to no result and which queries were abandoned, you can act on that knowledge: change the authoritative pages and query rules, add or change the metadata. Or even ask for content that turns out to be missing altogether.

As a site collection owner you can check the search reports for your site collection. And as an administrator you can get reports for ShaePoint Online as a whole.
How? Click Site collection administration > Popularity and Search reports, or Admin > SharePoint > Search > View Usage reports (see also View usage and search reports):

Search reports for the site collection.

Search reports for the site collection.

Filter and sort the result to get rid of the clutter

Tip 5: Search Center for portal

Users on the homepage of the SharePoint Online intranet, or more generally in the portal, usually want to search everything: they are at the front door and want to find something in the environement as a whole. And because they are searching everything, it is very important that they can filter the potentially huge result to narrow it down to what they are looking for.

The Search Center that SharePoint contains by default allows you to configure the results pages, to show the information and the refiners that are most suitable to the users in your organization. The site collection ‘search’ is available by default.

You can start making use of it, by entering its url in the search settings of the portal site collection, and selecting that you want to send queries to the results page of that Search Center. Then you can edit that results page to meet your needs. See also Manage the Search Center in SharePoint Online.
How? Click Site settings > Site collection administration > Search settings:

Search settings to use the search center.

Search settings to use the search center.

Tip 6: Search this site in teamsites

Contrary to users in the portal, who want to search everything, users in a team site usually want to find something in that team site first. After all, they have navigated here purposefully. So make sure in the search settings of your team sites, that the users search this site by default. But allow them to search everything or one of the other search verticals instead, if they prefer. See also Specify search settings for a site collection or a site.
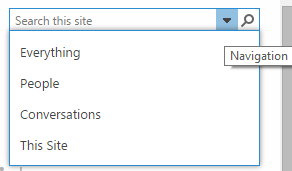
Search from a team site: by default within this site, or elsewhere.

Search from a team site: by default within this site, or elsewhere.

How? Click Site settings > Search settings > Turn on the dropdown menu:

Team site search settings: search in this site, but allow the user to search everything via the dropdown.

Team site search settings: search in this site, but allow the user to search everything via the dropdown.

Tip 7: Add relevant refiners

In the Search Center we discussed in Tip 5, you can edit the results pages and add refinement options that are relevant to your organization. For example, you can allow the users to filter by content type, theme, business division or whatever metadata are relevant for you.

Select the refiners carefully, because you should not add too many of them. SharePoint may get slow if there are more than 10 refiners. And users will need to scroll down too far in order to even see the last refiners. Note that only the refiners that actually have results are displayed. The advantage is that users will not be led to click a refiner that yields zero results. The disadvantage is that not everybody understands, so explain it.

How to add these refiners? On the search center results page click Edit > edit refinement web part > add or remove refiners and move them up or down:

Edit the refinement panel in the search center.

Edit the refinement panel in the search center.

You can simply select standard SharePoint metadata as refiners. If you want to use your own custom metadata as refiners, you need to make them available first, by adding them to the search schema, as refinable managed properties.
Note: in SharePoint Online, you cannot add new managed properties. What you need to do is use one of the existing “empty” refinable properties, like RefinableString01, and map the crawled property to it corresponding to your custom metadata; pick the one labeled ows_[MyProperty]. For more details, see Ben Prins’ blog post SharePoint Online: Search refiners and searchable columns and How to add refiners to your search results page in SharePoint 2013 (most of it is applicable to SharePoint Online too; not the reindexing though).

You can do this as a site (collection) owner for your site (collection) in the search center, or as an administrator for the entire SharePoint Online environment.
How? Click Site settings > Site collection administration or Search: Schema, or
Admin > SharePoint > Search > Manage Search Schema.

Search schema: connect your custom crawled properties to RefinableString managed properties.

Search schema: connect your custom crawled properties to RefinableString managed properties.

Tip 8: Use meaningful labels

Of course you should always use meaningful labels, for everything. But in the context of the search, this is even more important, because some labels are rather unclear to completely meaningless if you are not careful. In particular, this applies to the labels of the new refiners that you add, and to the sort order options.

The custom refiners that we discussed in Tip 7 by default are called RefinableString01 etc. You need to change the display name.

How? Edit the results page > Edit refinement web part > select the refiner > fill in the display name:

Change the display name of a search refiner.

Change the display name of a search refiner.


By default, the search result is sorted by relevance. In the settings of the webpart on the results page, you can allow the users to select a different sort order. The labels of some of these sort orders are not very clear though. In the translation to Dutch (I have only checked that translation), the label is even more incomprehensible. However, you can change the label:

  • Lifetime Views = Most viewed
  • Recent Views = Most viewed in the last 2 weeks
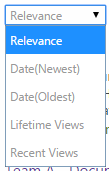
The user can change the sort order of the search result.

The user can change the sort order of the search result.

How? Edit the results page > Edit the Search Results web part > Settings > Available sort order: change the name of the label you want to change, e.g. “name”:”Lifetime Views” becomes “name”:”Most viewed”:

Change the sort order settings.

Change the sort order settings.

See, judge and use the result at a glance

Tip 9: Predefined search overviews

In addition to allowing the user to search her own results, you can also offer dynamic overviews that are based on predefined search queries. Then the user does not even have to perform a search to see what’s new and relevant in that part of the intranet. For example, you can display a ‘Who is Who’ page that displays people results at a glance.

Who is who page, with a predefined people search result.

Who is who page, with a predefined people search result.

How? Create a who is who page in your search center > Edit the search result web part > Change the query > Query text: {searchboxquery} contentclass:spspeople -{spoapp} -{spocrawler} -{Foreign}

Who is who page query.

Who is who page query.

Or you can display the most popular items, or the latest pictures.

Standard SharePoint search based content and content roll-up webparts, with standard configuration options.

Standard SharePoint search based content and content roll-up webparts, with standard configuration options.

How? There are standard webparts for this, in the sections Search-driven web parts and Content Roll-up.

Search-driven Contentweb parts and Content Roll-up web parts

Search-driven Contentweb parts and Content Roll-up web parts

Put one of these webparts on your page > Edit the web part > Select a display template for the control and for the item to determine what the result looks like (e.g. a list with two lines, or a slideshow with big images.
You can also change the query, if the default query does not suit you. Note: in the query wizard, you need to switch to advanced mode in order to change the sorting, for example to LastModifiedTime to see the pictures that were last modified. See Configure a Content Search Web Part in SharePoint.

Tip 10: Display relevant properties

To help the users see and judge at a glance what they have found in the search result, you can change the the overview and hover panel, to display the properties that are important for your organization. For example, the theme of the content or the contact details of a person.

Special display templates for the Who is Who page, displaying additional properties.

Special display templates for the Who is Who page, displaying additional properties.

You can do that as the owner of a publishing site (collection) or the administrator, by creating new Display Templates. These templates are HTML and some scripting, so you don’t have to be a developer to do create them. I am not an HTML or scripting guru, but I can still create display templates, by copying existing SharePoint and making some changes to the copies.

How? The most basic way is this: Starting with a publishing site (you don’t have this option in a team site) click site settings > Masterpages and page lay-outs > Display templates > Search >Download an original HTML file of a similar template as a starting point > edit the HTML file> upload the new file; the .js is created automatically so you don’t have to do anything with that file. Then select your new display template in the search results webpart where you want to use it. See for more details Change how search results look by using result types and display templates and the series How to change the way search results are displayed in SharePoint Server 2013.


So you see, you can enhance the search functionality offered by SharePoint Online to help the users find what they need, and you can do it without developing custom software. You just need owner or administrator permissions, for some things. And most of all, understanding of the possibilities.

October 31, 2014

Office 365 Tasks overview

Filed under: Office365 — Tags: — frederique @ 20:05

I have many tasks to perform. Some are managed in my Outlook tasks, others are managed in SharePoint team sites. So how do I get an overview of what I have to do today, regardless of where the task was created? In Office 365, the answer to that question is: in Tasks. It does not work quite as nicely as I had hoped though.

In a previous version of SharePoint, we had an overview of tasks in our personal ‘My Site’. In the latest version of Office 365, the ‘About Me’ page and my OneDrive for business do not mention tasks anymore (see the Microsoft notice).

Now we have a specific section in Office 365 called Tasks.

Each team site task list has its own entry in Tasks. And 'Flagged items and tasks' gives an overview.

Each team site task list has its own entry in Tasks. And ‘Flagged items and tasks’ gives an overview.

In the view ‘Flagged items and tasks’ I get an overview of tasks I created in my Outlook tasks list, e-mails I have flagged for follow-up, as well as tasks from team sites and project sites in SharePoint Online.
In addition, I can access the tasks assigned to me separately per task list in the SharePoint sites.

I like that

  • I get an aggregate overview of the tasks in my different SharePoint sites
  • This overview is visible as a separate Tasks section in Office 365. As these tasks come from Outlook as well as SharePoint, that makes more sense than hiding them in the one or the other.
  • In my Tasks section of Office 365 I only see tasks assigned to me, not tasks assigned to someone else. After all, this is my tasks overview.
  • I can not only see, but also complete or edit the tasks from the Tasks section: Click Edit at the top right corner, and update the form right there in the Tasks section:
    Click the buttons to Edit or Complete the task.

    Click the buttons to Edit or Complete the task.

    Update my tasks in the form; click 'More details' for the other fields.

    Update my tasks in the form; click ‘More details’ for the other fields.

Things to take into account when you use this:

  • The label says Tasks and they really mean that: other items assigned to me are not included. So no issues assigned to me, or items from custom lists where I am added to the ‘Assigned To’ field.
  • It may take some time to before the site tasks become visible in the Tasks overview in Office 365 in the browser. I had to wait about 10 minutes for some tasks, though others appeared immediately.
  • Tasks that only have basic information (a title, due date and assigned to) show only that information in the Tasks section:
    Only the title, due date and assigned to has been entered in the site.

    Only the title, due date and assigned to has been entered in the site.

    Tasks that also have some more advanced information, like 10% complete, display the full details:

    A description, status and %complete have also been entered in the site, so we get a detailed version of the task.

    A description, status and %complete have also been entered in the site, so we get a detailed version of the task.

I don’t like that

  • In the Tasks overview I get no context:
    • I cannot click from the task in the Tasks overview to the item in the site.
    • I cannot even see in which site this task has been created, so I cannot see in the context of which project I have to perform this tasks. I hope this gets added really soon…
  • The site tasks did not appear automatically in the Tasks section. I had several tasks in sitea, but none of them were visible. Until I clicked ‘Sync to Outlook’ in one of those task lists. Then all of my sites displayed their tasks in the Office 365 Tasks overview. I suppose this is a temporary hiccup, because the microsoft notice actually states that this button will disappear.

    Sync my site task list to Outlook.

    Sync my site task list to Outlook.

  • The tasks in the desktop version of Outlook does not show the site tasks correctly. My test task is due tomorrow in the site. I can see that in Tasks in Office 365 in the browser. But that task is shown as due today in the Tasks section of my Outlook on the desktop. It looks like the desktop version wants me to perform all my site tasks a day earlier than the Online version. But only for site tasks, not for regular tasks…

    The tasks are not the same in the online version in the browser and the deskop version

    The tasks are not the same in the online version in the browser and the deskop version

So all in all, Office 365 Tasks section can be quite useful, if it develops in the right direction, displaying a clear overview of the tasks that I have to perform regardless of where in Office 365 they have been created.

September 30, 2014

Why is that document not found? 6 tips to troubleshoot the SharePoint Online search

Filed under: Office365 — Tags: — frederique @ 23:53

The search in modern SharePoint in general, and in SharePoint Online in particular, is great. It helps users to find content and people quickly and easily. But it is not magical. And it is not always as intuitive as I hoped. Here are a couple of tips to help you to find out what’s happening when users cannot find what they are looking for. There are probably more possibilities, but these are based on my personal lessons learned.

1. Is it is a duplicate of another document?

If several files are the same, the search will only give you one of them and not its copies: its duplicates. And they don’t even need to be exactly the same: they can have different filenames, different titles and some difference in their content, but SharePoint still considers them to be duplicates.

This is a feature and not a bug: users don’t want to be swamped with duplicates that push the other relevant documents out of sight.

However, it can be very confusing if you expect to find a specific document and it is not displayed. I know I was confused, when I had added several test files in various sites, with different filenames and different titles, and I found only one of them.

In the hover panel, a link to 'View duplicates'. In the Dutch version of SharePoint weirdly translated as 'Dubbels weergave'.

In the hover panel, a link to ‘View duplicates’. In the Dutch version of SharePoint weirdly translated as ‘Dubbels weergave’.

Duplicates hidden behind the link 'View duplicates', even though they have different titles and different filenames

Duplicates hidden behind the link ‘View duplicates’, even though they have different titles and different filenames

So what you can do about this is:

  • Be aware of this functionality of the search and warn the users
  • Activate the link to display the duplicates. This link will appear in the hover panel of the one document that is found – so it is not very visible, explain it to the user. Clicking on that link will show all duplicates of this document.

2. Does the user have permission to see the document?

This is an oldie, but it can still confuse users. If you do not have permission to read a document, you will not find it in the search either.

Again, this is a feature and not a bug, because usually users have only permission to access a few of the loads of team sites in their SharePoint environment. And it would be very annoying to get a lot of results in their search, only to discover that they cannot actually open anything.

However, if the users were supposed to have permission to see the documents and they have been omitted for some reason, this becomes a problem. They won’t find out what they are missing by searching. They will have to discover in some other way that this relevant document exists and then request permission, so that next time they can find it via the search.

So explain to innocent users that this is how it works.

3. Is it a draft, instead of a published document?

We just discussed the security trimming of the search: if you don’t have permission to see a document, you will not find it in the search. That means that if I do have permission to see the document, I will find it in the search result, right? Wrong!

If a document is a draft that has not been published, you may not find it in the search. That depends on the versioning settings of the document library it lives in: libary settings > Versioning settings > Who should see draft items in this document library?

Versioning settings: Who should see draft items in this document library?

Versioning settings: Who should see draft items in this document library?

  • Any user who can read items:
    If everyone who can read the documents can also see the drafts, then you will find the drafts in the search result.

    • If the document has not been checked in yet, only the author can see the document in the library and only the author can find it with the search. This is something I expected.
    • If the document has been checked in as a draft, a minor version, all site visitors can find it with the search. Again, as expected.
  • Only users who can edit items
    If only users who can edit the items are allowed to see the drafts, then you will not find the drafts in the search result. Not even if you are the author of the drafts. This one, I did not expect…

The reason is that the crawl account apparently does not have permission to see the drafts, even if you have that permission in the library.

Files that have not been published in my test library: one of them has not even been checked in.

Files that have not been published in my test library: one of them has not even been checked in.

With the setting ‘Any user who can read items ’, a Site Visitor finds the drafts that have been checked in. Only the draft that has not even been checked in is left out.

With the setting ‘Any user who can read items ’, a Site Visitor finds the drafts that have been checked in. Only the draft that has not even been checked in is left out.

With the setting 'Only users who can edit items' even the author cannot find the file, even when searching for the exact filename.

With the setting ‘Only users who can edit items’ even the author cannot find the file, even when searching for the exact filename.

4.Are its library and site included in the search?

By default, everything is included in the search. However, it is possible to exclude a library or an entire site – and all their content – from the search. If that has been done, nobody will find the documents that live there by using the search.

  •  At the library level: Library settings > Advanced > Allow items from this document library to appear in search results? = Yes

    In the Advanced settings: Allow items from this document library to appear in search results?

    In the Advanced settings: Allow items from this document library to appear in search results?

  • At the site level: Site settings > Search and offline availability > Allow this site to appear in search results? = Yes.

    Site settings: Search and offline availability

    Site settings: Search and offline availability

So check these settings if users complain that they cannot find a document.

5. Are you searching for a synonym of the official term?

One of the great ways of making your content more “findable” is to enrich it with metadata: categories that can be managed centrally for your organization in the Term Store. In that this Term Store, the terms can get additional labels, for synonyms of that term. The author who tags his document, can either use the term itself or one of its synonyms; it will carry the official term regardless of the synonym the author picked.

I expected the search to take these synonyms into account, and give me the appropriate results when I search for a synonym.

However, the synonyms entered in the term store are completely ignored by the search; I got no result whatsoever for the (exotic) synonym I searched for. And the alternative for dealing with synonyms, a thesaurus, does not seem to work in SharePoint Online at this time (“Unfortunately, it is not feasible to do that in SharePoint Online“). Hm.

So monitor the usage of the search, to see if people are trying to find content by synonyms that lead nowhere and then ask content owners to use the synonym in the content or in other metadata (like enterprise keywords). And ask Microsoft to fix this, because I feel it is a gap in the functionality.

6. Is the document too recent?

Normally I find items within a couple of minutes, say 15 minutes at the most, after I have created them. However, sometimes it takes a lot longer. A couple of hours instead of minutes.

In SharePoint Online there is not much I can do about this: I cannot kick off a crawl to hurry the system. I can only check the service health log to see if Microsoft has reported any issues with the search, or enter a service request. Or I can be more patient…

August 31, 2014

July 31, 2014

Invisible documents: a feature or a bug?

Filed under: ECM,Usability — frederique @ 23:56

I see this time and time again. Or actually, I do not see them: invisible documents in SharePoint. Confused users ask why nobody else can see the documents that they have uploaded. So why are their documents invisible to their colleagues, while they can see their own documents just fine?

Usually these documents are invisible for one of two reasons, which have been haunting SharePoint for many years and many versions: the documents have not been checked in, or they are secured more tightly than the contributor thought.

These are features that make documents invisible to keep SharePoint clean and clear. Except that they turn into bugs when the users don’t expect them and either miss important information or start littering SharePoint with redundant copies of invisible documents.

Documents that have not been checked in

It is becoming easier and easier to upload multiple documents at the same time: you can now drag and drop them into the library.

Drag and drop multiple documents into a SharePoint document library

Drag and drop multiple documents into a SharePoint document library

But doing so, you by-pass the required fields that you are forced to fill in before you can save a document that has been uploaded individually. And when the required metadata fields are empty, the document cannot be published. So it remains in a draft state: checked-out. This is of course a feature to protect the integrity of the document collection. But it is perceived as a bug by the users…

This document that has been uploaded and left checked-out is only visible to the user who has uploaded the document. Nobody else can see it in the library, not even the site owner and not even an administrator. The uploader can see that his document is still checked-out: it has a green arrow at the file icon. But that arrow is quite subtle and user do not see it, unless they know about this. In this case, it would be more user-friendly if the system shouted a bit louder that you are the only person who can see the document.

Documents that are checked out can be recognized by their green arrow icon

Documents that are checked out can be recognized by their green arrow icon

For me, a clue that this problem has arisen is when I see in the site content that there are more items in the library than the number I can actually see in the unfiltered views as a site owner or administrator.

Fortunately, the site owner can check in the library settings if there are any invisible documents that have not been checked in: In the ribbon go to Library > Library settings > Permissions and Management: Manage files which have no checked in version.

Here you can see which files have been left checked-out when by whom.
And as a site owner, you can take ownership of these files. For example, when the uploader cannot be contacted and a colleague needs this document, the site owner can check it in to make it visible.

Documents-CheckedOut-TakeOwnership

Manage files which have no checked in version

But it is better minimize this invisibility problem, so:

  • Explain to your colleagues that they need to make sure their documents are checked in.
  • If this happens a lot, the site owner may have to change the fields so that they are no longer required. It is bad to have documents that are not tagged with the correct metadata. But it is often worse to have documents that are invisible. It is easier to reprimand contributors who have left fields visibly empty than people who have added invisible documents.

Documents that are not accessible

SharePoint has security trimming: you only see the names of files and other items that you are actually allowed to open and read. Of course this is a great feature, because it would be really unfriendly to let users click on a name only to find out that they are not allowed to open the item.

However, this is perceived as a bug when the users expect their colleagues to have permission to see the document and it turns out they don’t.

As a site owner, you can check if the invisibility users complain about is caused by security. For a specific document you (or the uploader himself) can check who the document is shared with:

Check who the document is shared with.

Check who the document is shared with.

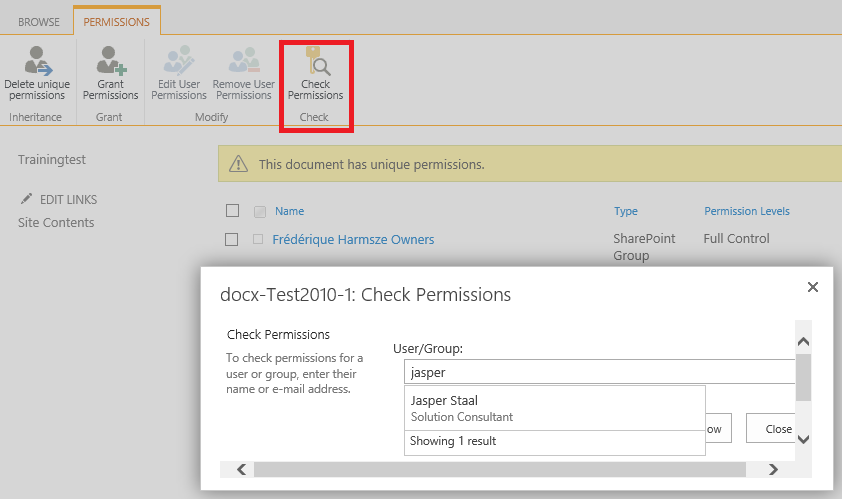
To look at it in more detail, especially if the document is shared with many people: Click Share > Shared With > Advanced. There you can open the group to see who is in there, or click Check permissions to check if a particular user has access to this item.

Check in more detail if a particular user has access to a document is accessible to many people

Check in more detail if a particular user has access to a document is accessible to many people

But it is better minimize this invisibility problem, so keep the security structure as simple and as clear as possible:

  • Avoid using item-level security, because you cannot see easily from the outside who has permissions to do what with the document (you have to click into the item menu to find out) and that increases the risk of mistakes and unexpected invisibility
  • Add people to groups like Visitors and Members rather than giving them read or contribute permission individually. Then it is easy to remove an entire group from a document library called ‘confidential documents’, for example.
  • Give “secret” libraries and sites a name that clearly indicates that not everybody has access to it.

So they are features, but users may perceive them as bugs and the invisible documents as ghosts. But fortunately it is possible to do some ghostbusting and make the documents as visible as they should be.

June 30, 2014

Take advantage of what you have and work around the limitations

Filed under: Office365 — Tags: — frederique @ 23:47

I’ve just returned from a holiday in France. We went traveled the coast of Normandy and Brittany. Nature plays a star part there. And the people have learned to take advantage of nature’s bounty, while working around its tricky aspects. Hm, that reminds me of working in a SharePoint and especially in an Office 365 environment.

No, I did not think of SharePoint or digital workplaces while I was there. I enjoyed the beautiful cliffs and beaches, capes and bays, shallows and currents, the fields and orchards. And of course the resulting sea food, crêpes and cider.

But now that I am getting back in Office 365 gear, I am looking at my photos from a different angle…

Erquy harbour at low tide

Erquy harbour at low tide

The low tides enable people to gather shellfish that are no longer under water. And the mussels that spend part of their time above water get a better flavour. But your boat is above water too.

In SharePoint Online, we also have to wait until things float again: search indexing, profile synchronisation. But that does make the experience richer, because the performance is not bogged down by batch jobs too often.

House integrated in the rock formations of Plougrescant

House integrated in the rock formations of Plougrescant

Many houses on the coast of the Plougrescant peninsula are built behind big granite rocks, or even squeezed between rocks, that shelter them from the sweeping winds. The sea was as calm as a mill pond while we were there, but it must be very different in wintertime…

These rocks offer protection, but they also limit your expansion. Like the SharePoint Online sites that work very well, unless you want functionality that is not included in the environment and then you’ll have to bring out the heavy machinery to break through.

Guillemots at Cap Frehel

Guillemots at Cap Frehel

Ok, so some of the people taking advantage of the rocky formations are birds: they lay their eggs and raise their chicks on cliff ledges, safe from non-flying predators. However, they have to take the ledges as they come. If there are no horizontal ledges, they can’t do anything about it and have to find a nesting site somewhere else. Luckily, we are more advanced than these birds and we can do some customization on our sites, even in SharePoint Online.

Little egret in the Golfe du Morbihan

Little egret in the Golfe du Morbihan

But you don’t have to accept passively what you are given, not even when you are a bird. You can shake things up to  make the good stuff available, like this little egret does when he shuffles his feet to stir up the fish. We ‘have content search web parts, for example, to shuffle up the most relevant information for us.

I will still have a lot of holiday fun, viewing and organising my photos. But it looks like I haven’t forgotten the mindset of a SharePoint consultant who creates no-code solutions, taking advantage of the available options, and working around the limitations of the standard environment.


May 31, 2014

10 lessons learned about migration training

Filed under: Governance,Office365 — frederique @ 13:52

Over the past months, I have been training users in the basics of Office 365 and on how to get there from their old system. They were using Lotus Notes, so they had to go quite a distance. And they had to take quite a few of the steps themselves, in addition to automated migration steps. I hope the users learned from these training sessions. In any case, I have learned a few lessons.

1. Acknowledge the fact that nobody wants to migrate

IT people and consultants often love to jump to the latest and greatest software. But regular employees are busy doing their jobs. The intranet or digital workplace are just tools for them: they expect these tools to work and don’t want to waste time on them.

So when I started my training sessions, I was in for a lot of grumbling: the Lotus Notes users heard that they not only had to get used to a new tool, but that they also had to spend time on migrating their e-mail.

To ease the pain:

  • I showed how the new tools can make their lives easier,
  • and how they are not so different from the old tools as to force them to relearn everything.
  • I explained what the IT department had done,
  • and what they could do themselves to make the migration take as little of their energy as possible.

2. Don’t make the training mandatory, but strongly encourage people to take action

The goal is not to make people follow the training sessions, but to enable them to migrate and start using the new tools smoothly. Some people need training for that, other can manage without training.

The organisers at first wanted to make the training mandatory, and I am very happy they decided to keep it optional. I do not want to have a group of people in my session who really don’t want to be there…

To help the people who don’t have much time:

  • we also offered short versions of the training at the end of the work day,
  • they had the option to follow a training session via teleconferencing ,
  • we had call to action e-mails and materials that the users could consult in their own time.
  • And when somebody dropped by to tell me they did not have the time for a full session, I could tell them in a few minutes what they absolutely needed to know to avoid problems.

3. Invite the participants explicitly

The employees don’t have time and this has little priority for them, compared to their “real” job. Make it as easy as possible for them to learn about the training sessions and to attend.

When I started with these training sessions, the organisers send the employees who were scheduled to be migrated an e-mail, containing (among a lot of other information) a link to page where they could find a training schedule and then click on another link to register for a training session. Hardly anybody showed up. Attendance was improved a lot, when they also sent meeting invitations to these people.

To make sure people did not miss the training by oversight

  • Send them a personal invitation; don’t just assume they will find it on the intranet.
  • Invite them in such a way that the session ends up in their calendar.

4. Try to get together in the same room, with teleconferencing as a fall-back scenario

It is easiest to check if people understand what you are explaining when you can look them in the eye. And the participants can ask their questions more freely when they are in the same room.

The training sessions we planned were at the participants’ locations. However, they could also join via a teleconference and screensharing via Lync. A few people did take advantage of that option. However, when the discussions became lively in the room, it was hard to follow and participate for the people who had joined us online.

5. Distribute your handout or materials at the beginning

Some people felt a bit overwhelmed by all the new information and all the actions they had to take. They need to be able to consult the information at their leisure. Or at least be reassured that it is there, in case they need it.

So I reassured them right at the start, that they did not have to remember everything I was telling them, because there were plenty of materials to consult afterwards, and plenty of contact points where they could ask their questions. We had created a flyer, which I distributed at the beginning of each session. Whenever I mentioned, for example, the address where they could consult their mail online, I also mentioned where that was printed in the flyer. I saw many people write additional notes or big exclamation marks on their flyer.

  • Put a checklist and instructions in a site, where you can keep them up-to-date if anything changes. Create a Yammer group to discuss the migration to the new tools.
  • Link to that information from the call-to-action e-mails and prominent pages of the intranet, and show it in the training session.
  • Create a hand-out that contains the key information and points to the information in that site.
  • Distribute it at the beginning of each session, so that the participants know what they already have at their disposal.

6. Speak the users’ language, not the corporate language

The main goal in a training session is that the participants understand what is taught and are able to interact in order to learn effectively. Do not assume that everybody speaks English.

I have received feedback from several annoyed users that they were unhappy to receive the official announcements and invitations to the training session in the corporate language: English. Especially at the factories and other locations where “the real work is done”. The corporate language usually only plays well at the corporate head office.

Fortunately, the training sessions themselves took place in the local language: Dutch, French and English in only a few cases, at Head Quarters. So I knew the participants could understand me, and they could readily ask questions and interact in the language they are most comfortable with. And that helped a lot.

6a. Corollary: Speak the users’ language, not IT language

The participants should learn what they should do and what’s in it for them.

Most employees in the company moving towards Office 365 are not in IT and do not want to know which software is doing what on which server to migrate them. Of course there are always some techie people who want to know these details, but you see others glaze over when the talk gets techie.

So I was happy that they IT department was migrated and trained before the others, so that we could have the techie discussions in their sessions without bothering the innocent users.

7. Focus on what is important for the participants

The employees have to assimilate a lot in a migration scenario, while they have little time and less enthusiasm for it.

So we focused on what they needed to know most at that time:

  • What they had to do in the migration to make that run smoothly and successfully
  • The key functionality in the new tools that they would need to know to get back to work after the migration.
  • The main reasons why the new tools would make their lives easier after the migration.

8. Show, don’t tell

People want to see for themselves what will happen in real life, and not just hear the theory of it.

So I showed them how the migration worked in my test mailbox. And I showed them how Office 365 worked, with special attention to functionality that is different from Lotus Notes. Because they could see how it worked in real life, they could also see the benefits for themselves. And we could honestly discuss the drawbacks, so that they knew they would not have to waste time searching for options that were no longer available.

9. Be flexible and interactive

The main advantage of a real-life training session over a set of pages and lists in a site, is that people can ask their questions and discuss their worries.

So I always had room for interaction, between me and the participants but also between the participants themselves. Especially in small groups, we could really focus on the subjects that they were most interested in. For instance, some teams already knew all about Outlook, so we looked at the other tools in Office 365.

10. Take the participants seriously but have fun with the session

No question is stupid. No concern is laughable. But that does not mean that the session should be all solemn and formal.

I liked the sessions to be rather informal, admitting up-front when I had a problem, allowing them to ask any question without being embarrassed by it. I had heard many questions before, so I could reassure them that they were definitely not the only ones struggling.


Actually, setting up and giving training sessions is like setting up and running an intranet: it is all about the users and helping them to reach their work goals. As long as we keep in mind that the training sessions and the intranet are not the goals in themselves, but a means to an end, then we’ll be fine…

April 30, 2014

Ways to send standard messages with Outlook

Filed under: Digital Workplace,Office365 — Tags: — frederique @ 23:36

As a consultant, I sometimes make people happy by pointing out the standard functionality of Office in their digital workplace, in this case: Office 365 and the Outlook 2013 that comes with it today. And also in this case, these are people who often send the same or almost the same message at different times or to different recipients. They don’t want to rewrite those messages every time. They want to re-use a standard message, quickly and easily. Outlook can help you do that in different ways, depending on your needs.

I’ve been giving a series of training sessions on Office 365, including Outlook (not my regular day job, but these sessions are given in English, Dutch and French, so they ended up on my plate…) Many of the participants asked me if their Lotus Notes stationery would migrate into Outlook. It turned out they use Lotus Notes stationery to create and send standard messages. And they wanted to know how they should do that after the migration to Office 365.

Well, there are different options. Copying the same text manually into each new message is of course always possible. But let’s look at some more sophisticated options: including it in a signature, resending a previous message, doing a mail merge in Word, or using stationary in Outlook. Which option suits you best, depends on what you are trying to do.

1. Include standard text in a signature

You can define different signatures in Outlook and pick the one you want to be displayed at the bottom of your e-mail. In such a signature, you can provide text, paste pictures, insert links etc.. No sophisticated layout, but you can for example get a numbered list by copying it from Word.

So you can just put your standard text with its trimmings in a signature, and select that signature when you want to send the standard message.

Signature including a standard text.

Signature including a standard text.

So when I received a lot of e-mails asking how to handle the same problem, I created a signature including the instructions and then replied all of these people by simply selecting that signature. I also created a signature for a standard notification that I sent to many people over the course of the years.

When a particular person needed to get a slightly different message, I simply modified the message before sending it. And when the instructions or notification changed, I could easily edit the signature, so that it would be updated for all future messages.

  • Pro: Very easy to use. Easy to create and modify the standard content. Can be used in new messages or replies.
  • Con: Does not include the mail address and subject heading. No attachments (but you can include a link to information on a team site). No sophisticated layout.
  • Use it for: Regularly sending simple standard messages or replies to different people, as is or after a slight tweak.

2. Resend a message

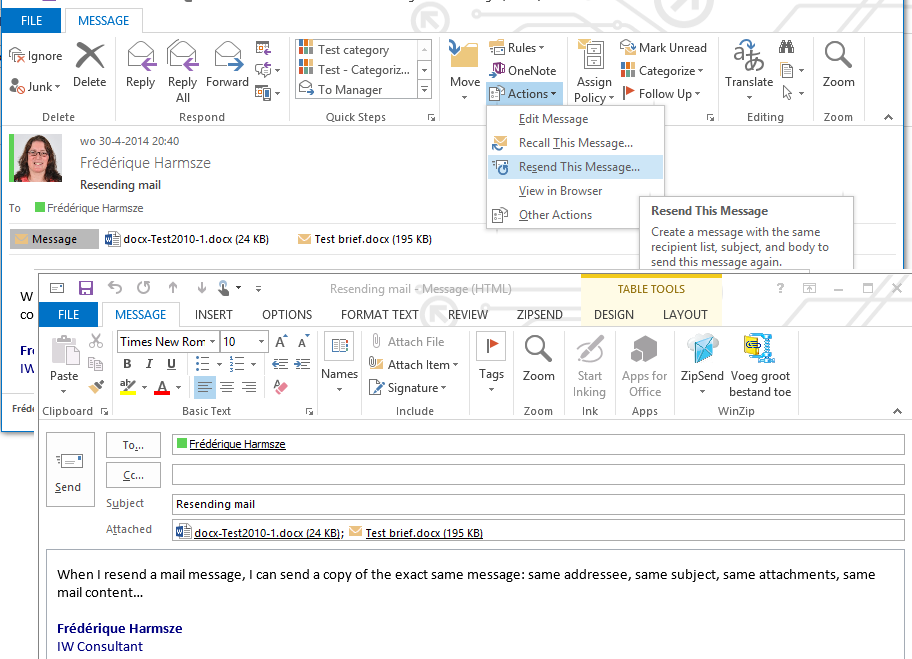
Outlook offers the option to resend a mail message. The previously sent message stays sent; it does not get canceled or retracted. You merely make a copy of the message you sent before, including its content, addressees, subject heading and attachments, which you can then send.

Before you hit ‘Send’ on the copied message, you can make some changes: tweak the content, add or remove addressees, add an attachment, whatever is needed.

Resending screenshot

Resending a reusable message

You do have to find that previously sent message first. Of course you can use the search to find it every time you need it. But if you resend such standard messages often, you may consider putting them in a folder in your sent items, where you can pick them up easily.

This is a great solution for the participants in my training sessions who have to send very similar e-mails, with the same attachments, to different people at different times. And also for the participants who are sending only slightly tweaked reminders to the exact same people every month. I also use this option to send a message that is almost the same, after a tweak, to other people on an ad hoc basis: no need to set anything up, not even a signature.

  • Pro: Includes mail body and its layout, mail address, subject heading and attachments. Very easy to use once you have located the message and have found the option under ‘Actions’. No set-up needed at all.
  • Con: You need to locate the message in your sent items (solution: put it in a folder)
  • Use it for: Sending the (almost) same message to the same people or different people again, especially if it has attachments. Just once, or over and over again.

3. Mail merge from Word

Take advantage of the Office integration to write your message in MS Word and send it via Outlook using the mail merge functionality.

You set it up in Word, in the Mailings tab. Start with the button Start Mail Merge, and it triggers you to select your recipients: people from your Outlook contacts list, or from a separate file (e.g. Excel) listing the recipients.

Then we get to the interesting part: you can insert variable fields from the selected recipients list. For example, a greeting line that gets filled with the name of the recipient from the list, a mention of the city where he or she is based, the phone number that you have in your list and that you may want to check. You can also use rules to display text depending on some criteria. For example, if no phone number is listed, display a message “Can you please give us your phone number?”.

Mail merge screenshot

Mail merge set up in Word (where I toggled field codes, so that you can see where the dynamic data are coming from) and its result in an e-mail.

This allows you to create and send beautifully customized messages to large groups of people, which can of course also be written and laid out as you wish using the regular Word options. Don’t forget to send it as HTML, because your lovely layout won’t work as plain text probably.

When you send the message, from the button Finish and merge, you can decide to send the mail in batches, if you have a large list of thousands of recipients. The recipients will get only their own personalized mail anyway; they do not see that a similar mail is sent to hundreds of others… When you save your Word document, you can send another mailing later. Read more about mail merge.

This mail merge option is very useful to, for example, sales people who send offers and suggestions based on the products and services that the recipient has bought, according to the sales lists. Another example is an intranet team that uses mail merge to send e-mails to a large list of site owners, specifying which sites they are managing according to the team’s inventory and asking them to confirm their ownership and take some action.

  • Pro: Message automatically customized based on the contact data.
  • Con: To much hassle for simple messages to small groups. No attachments, or cc/bcc recipients.
  • Use it for: Elaborate, personalized mailings to large groups of people.

4. Stationery

Stationery originally is about the paper that your write or print letters on: paper of the specified weight and color, with the logo, address information and “context” like that. In Outlook, stationery is mostly about fonts, colours, backgrounds and similar look & feel aspects.

At my client however, people used stationery in Lotus Notes to create standard messages that they could easily send and resend. So they ask me, where they can find the stationery in Outlook. And yes, you can also use stationery in Outlook. You can even create a standard message in stationery and send that at will.

E-mail using a custom stationery screenshot

Create a new e-mail using the previously saved stationery with a standard text.

The problem is that stationery was not meant for creating standard messages.
First of all, it is difficult to save a message and use it as stationery. Starting from the message that you want to save, click File > Save as > HTML > C:\Users\%username%\AppData\Roaming\Microsoft\Stationery. Then you can use it to create a new message via New Items > E-mail Message Using > More Stationary > your stationery name. The next time, your stationery will be in the short list, so you don’t have to dive into ‘More stationery’ anymore. Read more about stationery in Outlook.

And secondly, the result is not all that practical: the addressees, subject and attachments names are displayed in the body of the message. Not like in Lotus Notes, where these fields stayed in their fields…

  • Pro: Easy to use after the first time
  • Con: Difficult to set up. Does not include mail address, subject heading or attachments.
  • Use it for: Styling messages. Basically, use it a stationery and not as standard message.

So I value the options of including a simple standard message in a signature, resending messages and using mail merge to send sophisticated, personalized messages. And of course the good old copy & paste of content that I have included in my wiki process descriptions and elsewhere…

March 30, 2014

Roads are blocked? We can still work in our digital workplace!

Filed under: Digital Workplace,New world of work — frederique @ 17:06

The Netherlands hosted the Nuclear Security Summit this week. To safely accommodate and transport 58 world leaders and associate crowds of delegates, a lot of roads were blocked. We were all advised not to commute in this area. So could we all please work from home or anywhere except the offices in the NSS area? Yes, we can, in our digital workplace in the New World of Work!

This is not just a theoretical answer, but an empirical one. As it turned out, a lot of people did work from home during the summit. As a result, there were actually less traffic jams on the roads and the trains were less full than during a normal rush hour…

A lot of people concluded on Twitter and other social media that now we have proven that working from home in the New World of Word does work and we saw a lot of “workplace selfies” of people working from home in a very professional home office, or for example

Digital workplace on a train

…on a train….

Digital Workplace outdoors

… outdoors, grabbing some fresh air (it’s spring time!)…

So how about the messages we get from companies like Yahoo, who are asking their employees to stop working from home and get back to the office? Well, nobody said that the New World of Work implied working from home all the time. We can work anytime and anywhere and we should pick the time and place that suits the job at hand. For me, working from home is often more efficient and productive, while working at our own offices or a client’s offices may be more effective and innovative, depending on the day’s tasks. For example:

  • I work from home when I need to focus on writing documentation, configuring a lot of sites, performing administrative tasks, or something else for which I don’t want to be distracted or waste time on traveling.
  • I go to our office when I want to be inspired by my colleagues and inspire them to be innovative: serendipity works better if you can simply join a discussion at the coffee machine or ask colleagues sitting near you if they have an idea when you are stuck.
  • For working or training sessions with a group of clients, I prefer to be at the client’s location, to make sure we communicate seamlessly. We can look each other in the eye and pick up non-verbal clues, for example, when we are putting together the requirements for a solution, or when we start building and we think that some requirements needs to be discussed on the spot.
  • But when my clients are dispersed over a wide geographical area, then we do our session online and use the video conferencing options to look each other in the eye. It would simply be impractical to gather in real life for more than an initial kick-off or at most a once-a-year joint session with the key people, if even that can be managed given the budget and everybody’s agenda.
  • Usually I start from home and commute a bit later, to avoid the rush hour.
  • And when I go and see a client at their location in the afternoon, I work from home in the morning, to save traveling time.
  • En route to a presentation or meeting elsewhere, I do the last minute preparations on the train, so that I make productive use of my traveling time and have everything at my fingertips when I arrive.
  • And while I am waiting for my train or anywhere else, I can deal with my e-mail, check my to do list, manage my calendar, join in on discussion forums and of course talk to people on my smartphone.
  • Plus of course: I can keep working when something happens on the roads or rail roads, like a Nuclear Security Summit or a bad snowstorm. I work from home, so I don’t get trapped in traffic.

The thing is, that I am and feel responsible for my own work, so I can decide for myself where and how I can perform it optimally. My managers and colleagues trust me to do my job; they don’t have to see me in person do it. And they support me by placing an open and powerful digital workplace at my disposal.

In a way, my main workplace is digital, regardless of where I am physically. At our company and at clients, we use Office 365 in the cloud or SharePoint and Office on-premises versions, from laptops and other devices. Jasper Oosterveld has recently published a series of blogs on Office 365 from mobile devices. Tools in my digital workplace that I use a lot include:

  • SharePoint team sites for projects and ongoing department work, where we share information systematically: one version of the truth. We collaborate on documents with versioning and, for example, assign tasks and issues and track their status using lists. We can always get to these sites, wherever we have an internet connection. When I am traveling light with my iPad, I can still do the basics in my team sites. The screen is big enough to read and work comfortably. Site management and heavy-duty contributions can be a tricky on non-Microsoft devices.
  • Classic Office software like Word, PowerPoint and Excel integrate with these team sites: I can open a document from a team site, edit it, and save it back to the team site as the latest version. The options keep improving: the 2013 version allows for multiple authors to work in the same document at the same time in the browser, so you don’t even need Office on the device you are working on.
  • OneDrive and the sync option in SharePoint 2013 sites allow me to take documents offline (to work on while I am traveling by train for example) and synchronise them back to the site as soon as I am back online. I have some issues with this synchronization, maybe because I have connected too many different clouds to my laptop. But I hope this sync option gets more stable, as it can be very useful to me.
  • Outlook is a very powerful tool to manage my e-mail, calendar, tasks and address book. I have customized it with views, rules, short cuts and other options to suit my needs, and the search allows me find any item. When I am working on a client’s computer, inside their firewall, I can still access the online version. And I when I am away from any “big” computer, I can do all of this on my smartphone.
  • Lync enables me to chat with colleagues and clients who are also on Lync: see if they are available, ask a quick question, and then share my screen with them if I want to show them what I am talking about. A lot of my meetings take place in Lync, because for those meetings it is not worth the travel time and we can work more efficiently in the digital workplace. I don’t have to go to the Instant Messaging client separately, because it is integrated with the rest: it’s one integrated platform.
  • OneNote is getting more and more interesting as a tool to take notes and gather information as a team and share them in a team site: offline and online are integrated seamlessly. And the Office integration allows me also to, for example, add relevant mail messages or contacts to the notes in two clicks.
  • Yammer is becoming the discussion forum of choice for informal announcements, Q&A and brainstorming within the company. So far, it is only partly integrated with SharePoint, but as we move forward, it is getting better.
My digital workplace

My digital workplace: Office 365

Actually, I’ve been doing this for years and not just because of the Nuclear Security Summit that blocked the roads. We talk about the New World of Work or the New Way of Working, but it is not all that new.  But it is getting more and more relevant: easier because our digital workplace is getting better and better, and more and more widespread. We can work any time, any place and on any device and get the job done….

So when people ask if the Digital Workplace in the New World of Work actually works, we can answer with a resounding YES, we have seen it work!

February 28, 2014

Build it and they will come? Not if they do not adopt it

Filed under: Adoption,Digital Workplace,Governance — Tags: — frederique @ 22:24

Even if you have built a brilliant intranet or digital workplace, the people will not come and use it if they do not know about it, if they do not understand it, or if they do not feel that it is for them. They are all busy doing their jobs and do not want to be bothered by change, especially when they feel it is being forced on them as the latest fad from the IT department.

In a previous blog post I discussed five questions you need to address to get a Sharepoint environment that meets the users’ needs and can be really useful. In this article I focus on the other aspect: given a great tool, what can you do to get people to actually use it? You can start small with low hanging fruit, embed it in your organization and get leadership on board, communicate, involve the employees and find champions, and arrange for support like training and help where needed.

But before I go into details, let me first emphasize that you cannot simply force employees to adopt your system by making it mandatory without making it palatable. If your system does not meet their needs and they don’t feel comfortable with it, they will just find tools elsewhere (like dropbox when they don’t like your SharePoint). Or at some point quit and find an employer that does provide them with a workplace they like…

1. Start small, with low hanging fruit

You don’t have to launch everything that SharePoint has to offer to everybody all at once. People will just feel overwhelmed by all the options thrown at them. Concentrating on what’s in it for the employees:

  • Focus on simple functionality that can help a lot of people. For example, sharing documents and collaborating on them in a team site instead of e-mailing them back and forth and getting lost in the different versions.
  • Focus on eager users who can really benefit and may even be asking for a tool to help them, for example, to share documents with partners or process requests via a simple workflow. When a small team has used the new tool successfully to achieve their goals, you can show that to the others, their enthusiasm can spread and get the vibe going.
  • Focus on key content that many users need or find interesting. For example, HR information and today’s cafeteria menu (in many organization quite popular…). Make sure that content is in place when you go live and make sure that it is maintained afterwards.

2. Embed in the organization: get leadership on board

If the organization’s leadership is not on board, you firstly may run into trouble over funding. And secondly, employees may sit on the fence and wait it out.

This is especially true for the more social aspects of your environment, like discussion groups: some employees hesitate to share their ideas and give feedback in a public forum if they fear that management will disapprove. They need to know their manager will respond with kudos instead of complaints when they write up their discoveries in a blog post on the intranet.

When senior management participates enthusiastically and visibly, especially when they respond constructively to ideas and warnings, the employees will be more likely to stick out their necks and participate too.

3. Communicate, communicate, communicate

If the employees don’t know it’s there, they won’t come and take advantage of the brilliant digital workplace you’ve built. So tell them what you are going to build, what you are building and what you have built, what so cool about it and especially: what’s in it for them. This is not about the technology (although that may be of interest to some technical groups or technical organizations), but about the solutions that will make their jobs easier.

Make a communication plan and determine:

  • What you should communicate to which groups of people. For example, the basic benefits to all employees, productivity gain to managers, ease of site management to site owners.
  • Which channels to use for what: formal news articles on the homepage of your intranet, video, a series of informal blog posts, e-mail to people with special roles like site owners about the changes that will impact them, a few (very few!) e-mails to all employees about what they can expect (linking to intranet articles for more details), paper leaflets and quick reference cards explaining the steps they have to take, posters on the walls showing the benefits, …
  • What you should communicate when. For example, in the beginning tell about the results of the benchmark survey you did on the old environment, before launch explain what they can expect, after launch tell success stories of benefits gained by specific teams and share tips and best practices.

4. Involve the employees and find champions

Communication should not just be you broadcasting your information towards a silent crowd of employees. You also want to hear from them. You will need the input and feedback of the users to get an environment that really meets their needs. And you should make it clear that you are involving the employees, so that they don’t feel like you are trying to force your tool down their throats.

Tools that can help involve the employees include:

  • Serious surveys and quick polls
  • Focus groups
  • Social options in your existing intranet, like comment fields, discussion lists, yammer groups.
  • Just talking to them at the water cooler, coffee machine, or whatever you have…

When you are involving the employees, try to find and engage “champions”: people who can stimulate and help their colleagues to take full advantage to the new tools. These champions do not have to be the management sponsors or “officials” like the HR person or IT person for that part of the organization. It can be anybody who is enthusiastic and savvy about the new tools and willing to share.

So when a user is asking you smart questions about the new intranet, or often contributing to a discussion forum or blog, or contacting you about a team site that they manage and want to improve, or referring others to you for a specific solution, pay attention. These people are very valuable to you as representatives of and pioneers for their community.

5. Arrange for support: training and help where needed

The users may need help to understand the new tools and how to use them to their full potential. Usually, you hope your environment is so user-friendly that innocent end-users do not need training in order to use the basics. But, you’ll still want to arrange for:

  • Training for site owners and other people who need to play a more complex role.
    For instance, site owners who are expected to manage their sites and configure them to meet their users’ needs will probably need some training: how to create and modify lists and views, how to add elements to the homepage of their site, how to give people the right permissions to the right elements.
    Organize classroom training sessions at locations that can be reached, live online training sessions for people who cannot come to such a location, and recordings or other self-paced e-learning materials for people to follow at a later time.
  • A forum where users can share knowledge about the new tool
    For instance, site owners can ask questions and share tips in a Yammer group or community site.
  • Help content for all users, with a ‘Getting started’ page that offers a quick overview of the most interesting functionality and short cuts to, for example, my profile where I can upload my picture and enter my details. For users who want to know more, provide detailed help content.
  • Demo sites with some demo content that show a team site, a project site or a community site, where users can click around to see what such sites could look like
  • Playground sites where everybody can contribute, to see how it works.
  • Intranet team or at least an intranet guy/gel who the users can contact if the need assistance. Guide them to the best solution for the needs of their team, help them fix their site when it is broken, and simply hold their hand until they feel comfortable enough to take charge.

So…

So there are things you can do to help your users adopt the new tools and take advantage of them in their daily work.

  • Don’t wait until you have built everything and then start thinking about adoption. Involve your leadership and your users from the beginning, think about the low hanging fruit so that you are sure that works perfectly, train content owners at an early stage so that the key content is in place before you launch.
  • And then again, don’t stop after you have launched your intranet or digital workplace. Adoption is part of your ongoing governance: you keep monitoring what is needed, aligning with the organization, offering quick wins, communicating, involving the employees and proving support.

Your intranet or digital workplace is a living environment. You’ll need to keep an eye on it, using analytics tools and user feedback, to know how it is performing. You’ll need to feed it with good quality content and improvements, or it will starve. And you and the users need to adopt it and love it, or it will pine away…

« Newer PostsOlder Posts »

Powered by WordPress