As a consultant, I sometimes make people happy by pointing out the standard functionality of Office in their digital workplace, in this case: Office 365 and the Outlook 2013 that comes with it today. And also in this case, these are people who often send the same or almost the same message at different times or to different recipients. They don’t want to rewrite those messages every time. They want to re-use a standard message, quickly and easily. Outlook can help you do that in different ways, depending on your needs.
I’ve been giving a series of training sessions on Office 365, including Outlook (not my regular day job, but these sessions are given in English, Dutch and French, so they ended up on my plate…) Many of the participants asked me if their Lotus Notes stationery would migrate into Outlook. It turned out they use Lotus Notes stationery to create and send standard messages. And they wanted to know how they should do that after the migration to Office 365.
Well, there are different options. Copying the same text manually into each new message is of course always possible. But let’s look at some more sophisticated options: including it in a signature, resending a previous message, doing a mail merge in Word, or using stationary in Outlook. Which option suits you best, depends on what you are trying to do.
1. Include standard text in a signature
You can define different signatures in Outlook and pick the one you want to be displayed at the bottom of your e-mail. In such a signature, you can provide text, paste pictures, insert links etc.. No sophisticated layout, but you can for example get a numbered list by copying it from Word.
So you can just put your standard text with its trimmings in a signature, and select that signature when you want to send the standard message.
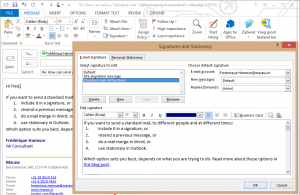
Signature including a standard text.
So when I received a lot of e-mails asking how to handle the same problem, I created a signature including the instructions and then replied all of these people by simply selecting that signature. I also created a signature for a standard notification that I sent to many people over the course of the years.
When a particular person needed to get a slightly different message, I simply modified the message before sending it. And when the instructions or notification changed, I could easily edit the signature, so that it would be updated for all future messages.
- Pro: Very easy to use. Easy to create and modify the standard content. Can be used in new messages or replies.
- Con: Does not include the mail address and subject heading. No attachments (but you can include a link to information on a team site). No sophisticated layout.
- Use it for: Regularly sending simple standard messages or replies to different people, as is or after a slight tweak.
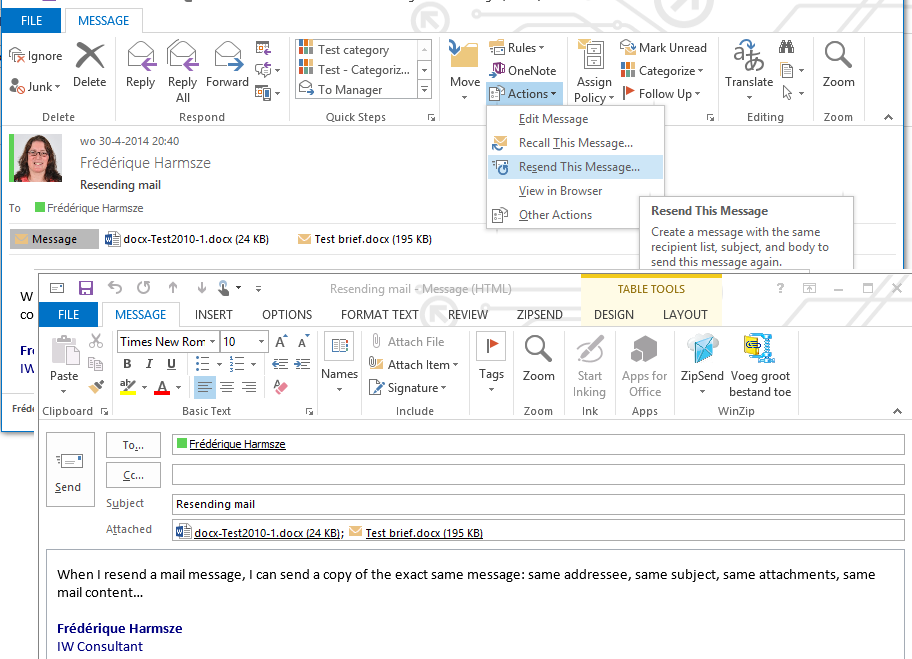
2. Resend a message
Outlook offers the option to resend a mail message. The previously sent message stays sent; it does not get canceled or retracted. You merely make a copy of the message you sent before, including its content, addressees, subject heading and attachments, which you can then send.
Before you hit ‘Send’ on the copied message, you can make some changes: tweak the content, add or remove addressees, add an attachment, whatever is needed.

Resending a reusable message
You do have to find that previously sent message first. Of course you can use the search to find it every time you need it. But if you resend such standard messages often, you may consider putting them in a folder in your sent items, where you can pick them up easily.
This is a great solution for the participants in my training sessions who have to send very similar e-mails, with the same attachments, to different people at different times. And also for the participants who are sending only slightly tweaked reminders to the exact same people every month. I also use this option to send a message that is almost the same, after a tweak, to other people on an ad hoc basis: no need to set anything up, not even a signature.
- Pro: Includes mail body and its layout, mail address, subject heading and attachments. Very easy to use once you have located the message and have found the option under ‘Actions’. No set-up needed at all.
- Con: You need to locate the message in your sent items (solution: put it in a folder)
- Use it for: Sending the (almost) same message to the same people or different people again, especially if it has attachments. Just once, or over and over again.
3. Mail merge from Word
Take advantage of the Office integration to write your message in MS Word and send it via Outlook using the mail merge functionality.
You set it up in Word, in the Mailings tab. Start with the button Start Mail Merge, and it triggers you to select your recipients: people from your Outlook contacts list, or from a separate file (e.g. Excel) listing the recipients.
Then we get to the interesting part: you can insert variable fields from the selected recipients list. For example, a greeting line that gets filled with the name of the recipient from the list, a mention of the city where he or she is based, the phone number that you have in your list and that you may want to check. You can also use rules to display text depending on some criteria. For example, if no phone number is listed, display a message “Can you please give us your phone number?”.

Mail merge set up in Word (where I toggled field codes, so that you can see where the dynamic data are coming from) and its result in an e-mail.
This allows you to create and send beautifully customized messages to large groups of people, which can of course also be written and laid out as you wish using the regular Word options. Don’t forget to send it as HTML, because your lovely layout won’t work as plain text probably.
When you send the message, from the button Finish and merge, you can decide to send the mail in batches, if you have a large list of thousands of recipients. The recipients will get only their own personalized mail anyway; they do not see that a similar mail is sent to hundreds of others… When you save your Word document, you can send another mailing later. Read more about mail merge.
This mail merge option is very useful to, for example, sales people who send offers and suggestions based on the products and services that the recipient has bought, according to the sales lists. Another example is an intranet team that uses mail merge to send e-mails to a large list of site owners, specifying which sites they are managing according to the team’s inventory and asking them to confirm their ownership and take some action.
- Pro: Message automatically customized based on the contact data.
- Con: To much hassle for simple messages to small groups. No attachments, or cc/bcc recipients.
- Use it for: Elaborate, personalized mailings to large groups of people.
4. Stationery
Stationery originally is about the paper that your write or print letters on: paper of the specified weight and color, with the logo, address information and “context” like that. In Outlook, stationery is mostly about fonts, colours, backgrounds and similar look & feel aspects.
At my client however, people used stationery in Lotus Notes to create standard messages that they could easily send and resend. So they ask me, where they can find the stationery in Outlook. And yes, you can also use stationery in Outlook. You can even create a standard message in stationery and send that at will.

Create a new e-mail using the previously saved stationery with a standard text.
The problem is that stationery was not meant for creating standard messages.
First of all, it is difficult to save a message and use it as stationery. Starting from the message that you want to save, click File > Save as > HTML > C:\Users\%username%\AppData\Roaming\Microsoft\Stationery. Then you can use it to create a new message via New Items > E-mail Message Using > More Stationary > your stationery name. The next time, your stationery will be in the short list, so you don’t have to dive into ‘More stationery’ anymore. Read more about stationery in Outlook.
And secondly, the result is not all that practical: the addressees, subject and attachments names are displayed in the body of the message. Not like in Lotus Notes, where these fields stayed in their fields…
- Pro: Easy to use after the first time
- Con: Difficult to set up. Does not include mail address, subject heading or attachments.
- Use it for: Styling messages. Basically, use it a stationery and not as standard message.
So I value the options of including a simple standard message in a signature, resending messages and using mail merge to send sophisticated, personalized messages. And of course the good old copy & paste of content that I have included in my wiki process descriptions and elsewhere…